OkHttp3是Android中应用最广泛的三方库,几乎所有的安卓应用都使用OkHttp来实现网络请求的,基本上都是跟Retrofit搭配使用。之前记录了OkHttp的使用,但是仅学会使用是最基础的,还应该研究它的源码实现,毕竟这么好的三方库不学习一波实在是太可惜了。
引入依赖 1 2 "com.squareup.okhttp3:okhttp:4.12.0" )
权限不要忘记加。
1 <uses-permission android:name ="android.permission.INTERNET" />
简单的请求 分析源码最好的方式是从一个最简单的使用方式开始,逐步追踪,查看其整体的实现逻辑,最后再去研究细节。这里从一个最简单的网络请求开始分析。
1 2 3 4 5 6 7 private fun request () val request = Request.Builder()"https://www.wanandroid.com/user/login" )val response = OkHttpClient().newCall(request).execute()"response = ${response.body?.string()} " )
首先创建一个Request,然后通过OkHttpClient创建一个newCall,实际得到的是Call的实现类RealCall,然后以同步方式执行。最终也就是拿到的是一个RealCall,然后将RealCall执行得到的Response。前面都属于细节,我们最关注的是整个网络请求的整体执行过程,因此我们可以看RealCall的execute方法。
1 2 3 4 5 6 7 8 9 10 11 12 13 14 15 16 17 18 19 20 21 22 23 24 25 26 27 28 29 30 31 32 33 34 35 36 37 38 39 40 override fun execute () false , true )) { "Already Executed" }try {this )return getResponseWithInterceptorChain()finally {this )@Synchronized internal fun executed (call: RealCall ) internal fun finished (call: RealCall ) private fun <T> finished (calls: Deque <T >, call: T ) val idleCallback: Runnable?this ) {if (!calls.remove(call)) throw AssertionError("Call wasn't in-flight!" )this .idleCallbackval isRunning = promoteAndExecute()if (!isRunning && idleCallback != null ) {
在execute中,整体步骤就是将Call添加到Dispatcher中的同步执行队列中,然后进行网络请求,请求结束后将该Call移除,并触发下一个Call的执行。 其中getResponseWithInterceptorChain就是最重要的,也是OkHttp中的核心五大拦截器。
1 2 3 4 5 6 7 8 9 10 11 12 13 14 15 16 17 18 19 20 21 22 23 24 25 26 27 28 29 30 31 32 33 34 35 36 37 38 39 40 41 42 43 44 45 46 47 48 @Throws(IOException::class) internal fun getResponseWithInterceptorChain () val interceptors = mutableListOf<Interceptor>()if (!forWebSocket) {val chain = RealInterceptorChain(this ,0 ,null ,var calledNoMoreExchanges = false try {val response = chain.proceed(originalRequest)if (isCanceled()) {throw IOException("Canceled" )return responsecatch (e: IOException) {true throw noMoreExchanges(e) as Throwablefinally {if (!calledNoMoreExchanges) {null )
在getResponseWithInterceptorChain中,添加了一个集合将用户自定义的拦截器以及默认的拦截器整合起来,然后以RealInterceptorChain来将所有的拦截器以责任链模式进行组合执行。
1 2 3 4 5 6 7 8 9 10 11 12 13 14 15 16 17 @Throws(IOException::class) override fun proceed (request: Request ) val next = copy(index = index + 1 , request = request)val interceptor = interceptors[index]val response = interceptor.intercept(next) ?: throw NullPointerException("interceptor $interceptor returned null" )return response
在每个RealInterceptorChain中,都会传递一个index下标用来标识当前的链节点应该执行哪个拦截器。在具体的proceed中,会去创建下一个RealInterceptorChain节点,并且在执行过程中将将其传递给拦截器。因此,我们在自定义拦截器中,必须要执行chain.proceed方法将链执行下去。
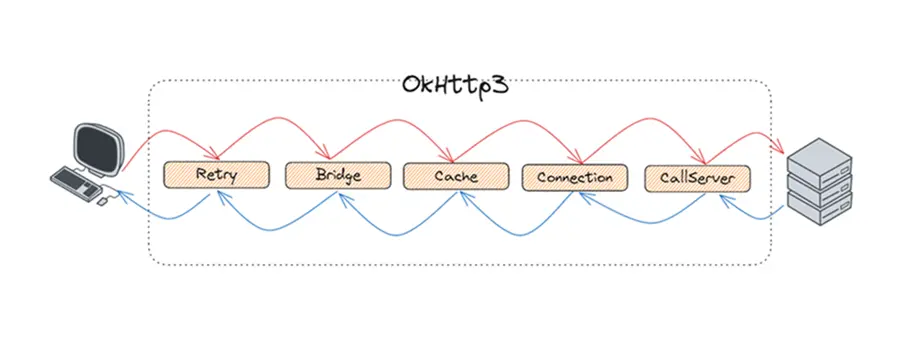
五大拦截器 在前面的getResponseWithInterceptorChain方法中,创建了一个链式执行方法,并添加了多个拦截器。如果去除自定义的拦截器外,还有五个拦截器。这是默认的拦截器,也是OkHttp的核心,通过这五个拦截器最终实现的网络请求。
RetryAndFollowUpInterceptor 重试和重定向拦截器。正常来说,我们的网络请求肯定会因为各种网络问题导致请求失败或者链接被重定向,该拦截器就是用于处理这种情况的,当请求发生错误或者被重定向后,该拦截器会直接再次发起请求进行重试,并且将重试次数设定为最多20次。
1 2 3 4 5 6 7 8 9 10 11 12 13 14 15 16 17 18 19 20 21 22 23 24 25 26 27 28 29 30 31 32 33 34 @Throws(IOException::class) override fun intercept (chain: Interceptor .Chain ) val realChain = chain as RealInterceptorChainwhile (true ) {try {try {catch (e: RouteException) {continue catch (e: IOException) {continue val followUp = followUpRequest(response, exchange)if (followUp == null ) {return responseif (++followUpCount > MAX_FOLLOW_UPS) {throw ProtocolException("Too many follow-up requests: $followUpCount " )
BridgeInterceptor 桥接拦截器。OkHttp的整个拦截器链是逐渐深入的,越往后拦截器执行的操作越偏底层。前面的重试和重定向拦截器负责的是整个网络请求的执行,用于异常时重新发起请求。接下来的BridgeInterceptor拦截器则是处理网络请求的head的处理和数据压缩处理,毕竟我们对于网络请求的速度还是有要求的,而gzip压缩方式在HTTP中应用的最广泛,BridgeInterceptor就用于添加gzip的head,并处理将压缩数据进行解压。
1 2 3 4 5 6 7 8 9 10 11 12 13 14 15 16 17 18 19 20 21 22 23 24 25 26 27 28 29 30 31 32 33 34 35 36 37 38 39 40 41 42 43 44 45 46 47 48 49 50 51 52 53 54 55 56 57 58 59 60 61 62 63 64 65 66 67 68 69 70 @Throws(IOException::class) override fun intercept (chain: Interceptor .Chain ) val userRequest = chain.request()val requestBuilder = userRequest.newBuilder()val body = userRequest.bodyif (body != null ) {val contentType = body.contentType()if (contentType != null ) {"Content-Type" , contentType.toString())val contentLength = body.contentLength()if (contentLength != -1L ) {"Content-Length" , contentLength.toString())"Transfer-Encoding" )else {"Transfer-Encoding" , "chunked" )"Content-Length" )if (userRequest.header("Host" ) == null ) {"Host" , userRequest.url.toHostHeader())if (userRequest.header("Connection" ) == null ) {"Connection" , "Keep-Alive" )var transparentGzip = false if (userRequest.header("Accept-Encoding" ) == null && userRequest.header("Range" ) == null ) {true "Accept-Encoding" , "gzip" )val cookies = cookieJar.loadForRequest(userRequest.url)if (cookies.isNotEmpty()) {"Cookie" , cookieHeader(cookies))if (userRequest.header("User-Agent" ) == null ) {"User-Agent" , userAgent)val networkResponse = chain.proceed(requestBuilder.build())val responseBuilder = networkResponse.newBuilder()if (transparentGzip &&"gzip" .equals(networkResponse.header("Content-Encoding" ), ignoreCase = true ) &&val responseBody = networkResponse.bodyif (responseBody != null ) {val gzipSource = GzipSource(responseBody.source())val strippedHeaders = networkResponse.headers.newBuilder()"Content-Encoding" )"Content-Length" )val contentType = networkResponse.header("Content-Type" )1L , gzipSource.buffer()))return responseBuilder.build()
从代码上面的注释可以看到,BridgeInterceptor主要的责任是在请求前添加各种header和cookie和gzip的支持,请求后保存cookie和解析gzip的数据。
CacheInterceptor 缓存拦截器。在各种请求方式中,GET和HEAD是最不涉及状态的,GET通常用来请求列表等数据,而HEAD通常只返回header头数据,用于判断数据是否有更新,因此这两种方式是可以被缓存的,如果请求的数据未发生变化的话,则直接从缓存中取出结果而不是发起一个实际的请求,CacheInterceptor中,使用了LruCache存储了请求的结果。
1 2 3 4 5 6 7 8 9 10 11 12 13 14 15 16 17 18 19 20 21 22 23 24 25 26 27 28 29 30 31 32 33 34 35 36 37 38 39 40 41 42 43 44 45 46 47 48 49 50 51 52 53 54 55 56 57 58 59 60 61 62 63 64 65 66 67 68 69 70 71 72 73 74 75 76 77 78 79 80 81 82 @Throws(IOException::class) override fun intercept (chain: Interceptor .Chain ) val call = chain.call()val cacheCandidate = cache?.get (chain.request())val now = System.currentTimeMillis()val strategy = CacheStrategy.Factory(now, chain.request(), cacheCandidate).compute()val networkRequest = strategy.networkRequestval cacheResponse = strategy.cacheResponseif (networkRequest == null && cacheResponse == null ) {return Response.Builder()"Unsatisfiable Request (only-if-cached)" )1L )if (networkRequest == null ) {return cacheResponse!!.newBuilder()var networkResponse: Response? = null try {finally {if (cacheResponse != null ) {if (networkResponse?.code == HTTP_NOT_MODIFIED) {val response = cacheResponse.newBuilder()return responseelse {val response = networkResponse!!.newBuilder()if (cache != null ) {if (response.promisesBody() && CacheStrategy.isCacheable(response, networkRequest)) {val cacheRequest = cache.put(response)return cacheWritingResponse(cacheRequest, response)if (HttpMethod.invalidatesCache(networkRequest.method)) {try {catch (_: IOException) {return response
缓存拦截器从本地缓存中获取缓存,如果取到了缓存并且是有效期限内的,则直接返回,此时不会发生网络请求;如果未取到,则会交给下一个拦截器去进行网络请求,并将请求结果缓存在本地。因此从这里看,在五大拦截器中,前三个拦截器执行的时候,是可能并没有发生实际的网络请求的。
在OkHttpClient的创建时,我们能添加两种拦截器,一种是addInterceptor一种是addNetworkInterceptor。从名字也可以看到一个是普通拦截器,一个是网络拦截器,执行顺序则是普通拦截器是第一顺序执行的,网络拦截器是在CacheInterceptor后执行的。差别就是普通拦截器会在每次请求的时候都会触发执行,而网络拦截器则只有真正发生网络请求的时候才会去执行。
ConnectionInterceptor 1 2 3 4 5 6 7 8 9 10 11 12 object ConnectInterceptor : Interceptor {@Throws(IOException::class) override fun intercept (chain: Interceptor .Chain ) val realChain = chain as RealInterceptorChainval exchange = realChain.call.initExchange(chain)val connectedChain = realChain.copy(exchange = exchange)return connectedChain.proceed(realChain.request)
ConnectionInterceptor代码行数较少,实际操作都在其他类中了。它被设计成单例模式,其主要工作就是创建或者复用已有的HTTP连接,并创建对应的Codec用于解析HTTP1或者HTTP2。
CallServerInterceptor CallServerInterceptor属于最后一个拦截器,它的主要职责真正的写入数据内容。首先向连接中写入请求头,然后是写入请求体,写入完成后从连接中读取响应头和响应体。
1 2 3 4 5 6 7 8 9 10 11 12 13 14 15 16 17 18 19 20 21 22 23 24 25 26 27 28 29 30 31 32 33 34 35 36 37 38 39 40 41 42 43 44 45 46 47 48 49 50 51 52 53 54 55 56 57 58 59 60 61 62 63 64 65 66 67 @Throws(IOException::class) override fun intercept (chain: Interceptor .Chain ) try {if (HttpMethod.permitsRequestBody(request.method) && requestBody != null ) {if (responseBuilder == null ) {if (requestBody.isDuplex()) {val bufferedRequestBody = exchange.createRequestBody(request, true ).buffer()else {val bufferedRequestBody = exchange.createRequestBody(request, false ).buffer()else {else {if (requestBody == null || !requestBody.isDuplex()) {catch (e: IOException) {try {if (responseBuilder == null ) {false )!!var response = responseBuildervar code = response.codeif (forWebSocket && code == 101 ) {else {return responsecatch (e: IOException) {
总结 通过上面的学习,可以看到OkHttp整体是采用的责任链的模式,以多个拦截器为链节点,将一个HTTP请求逐步分解,最终发送给服务端。同时也提供给我们两个拦截器节点用于添加自定义的拦截器,一个是通用拦截器,一个是网络拦截器,使得我们可以通过它去自定义各种功能。