View是我们在应用开发中用的最多的组件的,基本上所有的与界面相关的元素都是使用View呈现的。而Android为我们提供了很多的View供我们直接使用。如LinearLayout、ImageView等,当然我们也会根据自己的业务需求去自定义View,而在自定义的过程中,我们就会去在对应的绘制流程中做自定义操作。因此,了解View的绘制流程,对于我们自定义View来说是很有帮助的。
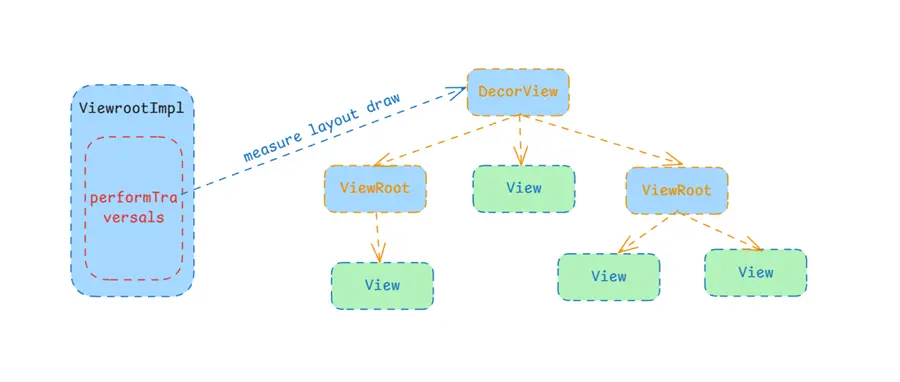
View的绘制 界面布局分为View和ViewGroup,整个界面布局都是以ViewGroup为根节点的一个View树,这棵树的根节点也就是DecorView,最终被添加到ViewRootImpl中,这个过程是在Activity#onResume的时候添加进去的。所以,后续对于View树的管理,最终都是由ViewRootImpl直接触发的。
如View的绘制,直接的触发者就是ViewRootImpl,它会在需要刷新时,通过preformTraversals触发View的三个流程。这个方法非常长,大概有一千行,这里只关注对于View绘制的部分。
Measure measure是View绘制的第一个流程,它主要的作用就是触发自己以及子View的测量,目的是计算出自己所需要占据的空间的大小。
1 2 3 4 5 6 7 8 9 10 11 12 13 14 15 16 17 18 19 20 21 22 23 24 25 26 private void performTraversals () {if (mFirst) {true ;else {if (desiredWindowWidth != mWidth || desiredWindowHeight != mHeight) {true ;true ;boolean layoutRequested = mLayoutRequested && (!mStopped || mReportNextDraw);if (layoutRequested) {
当触发preformTraversals的时候,并不是一定会触发布局的流程,而是会判断宽高是否发生了变化,只有发生了变化,才会去触发布局流程,最终也是通过measureHierarchy触发的。
1 2 3 4 5 6 7 8 9 10 11 12 13 14 15 16 17 18 19 20 21 22 23 24 25 26 27 28 29 30 31 32 33 34 35 36 37 38 39 40 41 42 43 44 45 46 47 48 49 50 51 52 53 54 55 56 57 58 59 60 61 62 63 64 65 66 67 68 69 70 71 72 73 74 75 76 private boolean measureHierarchy (final View host, final WindowManager.LayoutParams lp, final Resources res, final int desiredWindowWidth, final int desiredWindowHeight, boolean forRootSizeOnly) {int childWidthMeasureSpec;int childHeightMeasureSpec;boolean windowSizeMayChange = false ;boolean goodMeasure = false ;if (lp.width == ViewGroup.LayoutParams.WRAP_CONTENT) {final DisplayMetrics packageMetrics = res.getDisplayMetrics();true );int baseSize = 0 ;if (mTmpValue.type == TypedValue.TYPE_DIMENSION) {int )mTmpValue.getDimension(packageMetrics);if (baseSize != 0 && desiredWindowWidth > baseSize) {if ((host.getMeasuredWidthAndState()&View.MEASURED_STATE_TOO_SMALL) == 0 ) {true ;else {2 ;if ((host.getMeasuredWidthAndState()&View.MEASURED_STATE_TOO_SMALL) == 0 ) {true ;if (!goodMeasure) {if (!forRootSizeOnly || !setMeasuredRootSizeFromSpec(else {true ;if (mWidth != host.getMeasuredWidth() || mHeight != host.getMeasuredHeight()) {true ;return windowSizeMayChange;private boolean setMeasuredRootSizeFromSpec (int widthMeasureSpec, int heightMeasureSpec) {final int widthMode = MeasureSpec.getMode(widthMeasureSpec);final int heightMode = MeasureSpec.getMode(heightMeasureSpec);if (widthMode != MeasureSpec.EXACTLY || heightMode != MeasureSpec.EXACTLY) {return false ;return true ;
在measureHierarchy中会进行一系列的判断,首先根据WindowManager.LayoutParams的宽高属性判断是否是wrap_content来决定如何测量,如果是的话,则不会给实际的宽度限制,而是给一个少一点的baseSize来让子View测量,如果测量过后结果为尺寸太小,则会重新给大一点的宽度再次测量,如果还太小,则会在后面重新按原尺寸进行测量。
如果LayoutParams的宽度不是wrap_content,或者在前面的的测量中,两次的测量结果都太小,则会使用具体的窗口宽高进行测量。
1 2 3 4 5 6 7 8 9 10 11 12 13 14 15 16 17 18 19 20 21 22 private static int getRootMeasureSpec (int windowSize, int measurement, int privateFlags) {int measureSpec;final int rootDimension = (privateFlags & PRIVATE_FLAG_LAYOUT_SIZE_EXTENDED_BY_CUTOUT) != 0 switch (rootDimension) {case ViewGroup.LayoutParams.MATCH_PARENT:break ;case ViewGroup.LayoutParams.WRAP_CONTENT:break ;default :break ;return measureSpec;
在通过getRootMeasureSpec获取到root的测量属性后,就会通过performMeasure进行测量。注意View的测量属性是一个int值,然后高2位表示测量模式,低30位表示具体的数值。最终的测量还是走到了View的measure方法。
1 2 3 4 5 6 7 8 9 10 11 12 13 14 15 private void performMeasure (int childWidthMeasureSpec, int childHeightMeasureSpec) {if (mView == null ) {return ;"measure" );try {finally {false ;
MeasureSpec MeasureSpec是View的一个静态内部类,属于一个工具类,它的作用就是将模式和数值组合成一个测量属性,同样的也可以将一个测量属性拆分为模式和数值。它是用来限制子View的测量规格,其模式有三种:
EXACTLY:精确模式,通常在xml中设置宽或高为match_parent或者具体数值AT_MOST:最大模式,通常在xml中设置为wrap_content是为最大模式UNSPECIFIED:未指定模式,使用这种模式表示对宽高没有要求,类似于AT_MOST但是不需要给定最大值限定在了解了测量测试后,我们继续看后面子View的具体测量过程,即measure流程:
1 2 3 4 5 6 7 8 9 10 11 12 13 14 15 16 17 18 19 20 21 22 23 24 25 26 27 28 29 30 31 32 33 34 35 36 37 38 39 40 41 42 43 44 45 46 47 48 49 50 51 52 53 54 55 56 public final void measure (int widthMeasureSpec, int heightMeasureSpec) {long key = (long ) widthMeasureSpec << 32 | (long ) heightMeasureSpec & 0xffffffffL ;if (mMeasureCache == null ) mMeasureCache = new LongSparseLongArray (2 );final boolean forceLayout = (mPrivateFlags & PFLAG_FORCE_LAYOUT) == PFLAG_FORCE_LAYOUT;final boolean specChanged = widthMeasureSpec != mOldWidthMeasureSpecfinal boolean isSpecExactly = MeasureSpec.getMode(widthMeasureSpec) == MeasureSpec.EXACTLYfinal boolean matchesSpecSize = getMeasuredWidth() == MeasureSpec.getSize(widthMeasureSpec)final boolean needsLayout = specChangedif (forceLayout || needsLayout) {int cacheIndex = forceLayout ? -1 : mMeasureCache.indexOfKey(key);if (cacheIndex < 0 || sIgnoreMeasureCache) {else {long value = mMeasureCache.valueAt(cacheIndex);int ) (value >> 32 ), (int ) value);if ((mPrivateFlags & PFLAG_MEASURED_DIMENSION_SET) != PFLAG_MEASURED_DIMENSION_SET) {throw new IllegalStateException ("View with id " + getId() + ": " "#onMeasure() did not set the" " measured dimension by calling" " setMeasuredDimension()" );long ) mMeasuredWidth) << 32 |long ) mMeasuredHeight & 0xffffffffL );
在measure中也还是没有进行实际的测量,它首先会判读是否需要测量:宽高发生了变化或者forceLayout。当满足条件后还不一定会测量,而是根据宽高属性构建key,然后从缓存中查看之前是否已经对这对宽高属性测量过,如果查到的话会直接设置为宽高属性,查不到的时候才会去onMeasure进行测量。当然如果forceLayout的话就会直接测量了,也不需要管宽高是否发生变化,是否有缓存等。
1 2 3 4 5 6 7 8 9 10 11 12 13 14 public void forceLayout () {if (mMeasureCache != null ) mMeasureCache.clear();public void requestLayout () {
其中在froceLayout和requestLayout的时候,会设置FORCE属性,因此,如果我们想要强制进行测量时,就可以通过这两个方法中的任何一个来触发。然后接下来继续看onMeasure:
1 2 3 4 5 6 7 8 9 10 11 12 13 14 15 16 17 18 19 20 21 22 protected void onMeasure (int widthMeasureSpec, int heightMeasureSpec) {public static int getDefaultSize (int size, int measureSpec) {int result = size;int specMode = MeasureSpec.getMode(measureSpec);int specSize = MeasureSpec.getSize(measureSpec);switch (specMode) {case MeasureSpec.UNSPECIFIED:break ;case MeasureSpec.AT_MOST:case MeasureSpec.EXACTLY:break ;return result;
默认情况下,测量过程中并没有区分AT_MOST和EXACTLY,也就是说它实际上并没有区分wrap_content和match_parent,最终的结果都是按照match_parent处理的。因此,如果我们自定义View则必须要重写onMeasure来处理这两种情况。
1 2 3 4 5 6 7 8 9 10 11 12 13 14 15 16 17 18 19 protected final void setMeasuredDimension (int measuredWidth, int measuredHeight) {boolean optical = isLayoutModeOptical(this );if (optical != isLayoutModeOptical(mParent)) {Insets insets = getOpticalInsets();int opticalWidth = insets.left + insets.right;int opticalHeight = insets.top + insets.bottom;private void setMeasuredDimensionRaw (int measuredWidth, int measuredHeight) {
在前面的measure流程中,在onMeasure之后会检测flag中是否有PFLAG_MEASURED_DIMENSION_SET,如果没哟会直接抛出异常,这是在提醒我们重写onMeasure进行测量的话,测量完成后必须将测量结果通过setMeasuredDimension告知到View本身。到这里我们似乎已经看完了测量的流程,最终是走到View的onMeasure中进行测量。我们的界面并不是一个单独的View,而是一整颗View树,因此对于ViewGroup而言,则一定不能使用默认的onMeasure进行测量本身,而是应该重写该方法,在onMeasure的时候触发它的子View的测量。
我们看下FrameLayout是如何做的:
1 2 3 4 5 6 7 8 9 10 11 12 13 14 15 16 17 18 19 @Override protected void onMeasure (int widthMeasureSpec, int heightMeasureSpec) {int count = getChildCount();for (int i = 0 ; i < count; i++) {final View child = getChildAt(i);if (mMeasureAllChildren || child.getVisibility() != GONE) {0 , heightMeasureSpec, 0 );
实际上,当我们自定义ViewGroup的时候也应该按照它这样操作,首先触发每个子View的测量,最终计算出自身的宽高,然后设置下去。其中measureChildWithMargins是ViewGroup中定义的一些列方法,可以帮助我们快速触发子View的测量。
1 2 3 4 5 6 7 8 9 10 11 12 13 14 15 16 17 18 19 20 21 22 23 24 25 26 27 28 29 30 31 32 33 34 35 36 37 38 39 40 41 42 protected void measureChildren (int widthMeasureSpec, int heightMeasureSpec) {final int size = mChildrenCount;final View[] children = mChildren;for (int i = 0 ; i < size; ++i) {final View child = children[i];if ((child.mViewFlags & VISIBILITY_MASK) != GONE) {protected void measureChild (View child, int parentWidthMeasureSpec, int parentHeightMeasureSpec) {final LayoutParams lp = child.getLayoutParams();final int childWidthMeasureSpec = getChildMeasureSpec(parentWidthMeasureSpec,final int childHeightMeasureSpec = getChildMeasureSpec(parentHeightMeasureSpec,protected void measureChildWithMargins (View child, int parentWidthMeasureSpec, int widthUsed, int parentHeightMeasureSpec, int heightUsed) {final MarginLayoutParams lp = (MarginLayoutParams) child.getLayoutParams();final int childWidthMeasureSpec = getChildMeasureSpec(parentWidthMeasureSpec,final int childHeightMeasureSpec = getChildMeasureSpec(parentHeightMeasureSpec,
ViewGroup给我们提供了三个方法供我们快速触发子View的测量。
measureChildren:遍历子View,然后通过measureChild触发子View的测量measureChild:计算子View的测量属性,然后实际触发测量。measureChildWithMargins:计算子View的测量属性,然后实际触发测量。当我们自定义View的时候,通常情况下还需要处理LayoutParams相关的逻辑。默认情况下使用的LayoutParams只支持padding等基础属性,而如果想要使用margin的话,则需要处理使其支持MarginLayoutParams。当子View不支持margin的时候,我们测量子View需要使用measureChild,如果所有的子View都不支持margin的话,则可以使用measureChildren直接触发所有的子View进行测量。否则的话只能使用measureChildWithMargins来触发。
同样的,快速获取子View的测量属性也是有提供的工具方法的,就是getChildMeasureSpec:
1 2 3 4 5 6 7 8 9 10 11 12 13 14 15 16 17 18 19 20 21 22 23 24 25 26 27 28 29 30 31 32 33 34 35 36 37 38 39 40 41 42 43 44 45 46 47 48 49 50 51 52 53 54 55 56 57 58 59 60 61 62 63 64 65 66 67 public static int getChildMeasureSpec (int spec, int padding, int childDimension) {int specMode = MeasureSpec.getMode(spec);int specSize = MeasureSpec.getSize(spec);int size = Math.max(0 , specSize - padding);int resultSize = 0 ;int resultMode = 0 ;switch (specMode) {case MeasureSpec.EXACTLY:if (childDimension >= 0 ) {else if (childDimension == LayoutParams.MATCH_PARENT) {else if (childDimension == LayoutParams.WRAP_CONTENT) {break ;case MeasureSpec.AT_MOST:if (childDimension >= 0 ) {else if (childDimension == LayoutParams.MATCH_PARENT) {else if (childDimension == LayoutParams.WRAP_CONTENT) {break ;case MeasureSpec.UNSPECIFIED:if (childDimension >= 0 ) {else if (childDimension == LayoutParams.MATCH_PARENT) {0 : size;else if (childDimension == LayoutParams.WRAP_CONTENT) {0 : size;break ;return MeasureSpec.makeMeasureSpec(resultSize, resultMode);
实际开发中我们就可以直接使用getChildMeasureSpec来快速构建子View的测量属性,它会综合父View的测量属性和子View的布局属性来构建出子View的测量属性。具体可以看下面的表格:
子布局属性\父测量属性 EXACTLY AT_MOST UNSPECIFIED match_parent模式:EXACTLY & 值:父值 模式:AT_MOST & 值:父值 模式:UNSPECIFIED & 值:父值 wrap_content模式:AT_MOST & 值:父值 模式:AT_MOST & 值:父值 模式:UNSPECIFIED & 值:父值 具体dp值 模式:EXACTLY & 值:子值 模式:EXACTLY & 值:子值 模式:EXACTLY & 值:子值
layout 还是从ViewRootImpl开始触发,View绘制的三个流程都是在performTraverals中触发的。
1 2 3 4 5 6 7 8 9 10 11 private void performTraversals () {final boolean didLayout = layoutRequested && (!mStopped || mReportNextDraw);if (didLayout) {
进入布局的条件和前面的进入测量的条件是一样的,也就是说,measure和layout通常是一起生效的。最终通过preformLayout进入实际的布局阶段,其中参数mWidth和mHeight是在前面赋值的,其实际为mWinFram的宽高,即窗口的宽高。
1 2 3 4 5 6 7 8 9 10 11 12 13 14 15 16 17 18 19 20 21 private void performLayout (WindowManager.LayoutParams lp, int desiredWindowWidth, int desiredWindowHeight) {true ;true ;final View host = mView;if (host == null ) {return ;try {0 , 0 , host.getMeasuredWidth(), host.getMeasuredHeight());finally {false ;
其中host即是View树中的树根节点DecorView,由此布局的过程进入到View体系中。这里不去看具体的实现,直接看ViewGroup中的布局流程。
1 2 3 4 5 6 7 8 9 10 11 12 13 @Override public final void layout (int l, int t, int r, int b) {if (!mSuppressLayout && (mTransition == null || !mTransition.isChangingLayout())) {if (mTransition != null ) {this );super .layout(l, t, r, b);else {true ;
基本上是什么都没做的,最终还是回到super.layout()中。
1 2 3 4 5 6 7 8 9 10 11 12 13 14 15 16 17 18 19 20 21 22 23 24 25 26 27 public void layout (int l, int t, int r, int b) {if ((mPrivateFlags3 & PFLAG3_MEASURE_NEEDED_BEFORE_LAYOUT) != 0 ) {int oldL = mLeft;int oldT = mTop;int oldB = mBottom;int oldR = mRight;boolean changed = isLayoutModeOptical(mParent) ?if (changed || (mPrivateFlags & PFLAG_LAYOUT_REQUIRED) == PFLAG_LAYOUT_REQUIRED) {
在layout中可以看到还会调用了一次onMeasure,这是因为在measure时,如果新的宽高属性在之前已经被测量过并且还在缓存中存储时,是不会去通过onMeasure继续测量的,而是直接设置为缓存的宽高,并通过设置flag将onMeasure延迟到了layout流程中。本身引入缓存的机制是为了节省一次测量流程的,但是实际上很多View还是依赖onMeasure的,因此不能完全省略,而是将其延迟到了layout前执行,这样可以将performTraverals中可能出现的多次测量的过程缩减到一次,整体上还是提高了测量的效率的。
然后就是设置它本身的宽高,如果上下左右的坐标发生了变化,或者前面测量过,则通过onLayout将布局流程继续分发下去。onLayout是一个空实现,但是在ViewGroup中被重写为抽象方法。因此,如果我们是自定义View,实际上是不需要处理这个方法的,因为我们的位置是由父布局来设置的;但是如果我们是自定义的ViewGroup中,则必须要重写该方法,并在该方法中去布局它自己的子View。
例如我们看FrameLayout的实现:
1 2 3 4 5 6 7 8 9 10 11 12 13 14 15 16 17 @Override protected void onLayout (boolean changed, int left, int top, int right, int bottom) {false );void layoutChildren (int left, int top, int right, int bottom, boolean forceLeftGravity) {final int count = getChildCount();for (int i = 0 ; i < count; i++) {final View child = getChildAt(i);if (child.getVisibility() != GONE) {
实际看到就是计算需要给子View布局的左右坐标,然后通过layout方法继续将布局流程给到子View。需要注意的就是在onLayout中,坐标值实际上是相对于父布局的,因此如果一个View被放置在父布局的左上角,那么在onLayout中的left和top值均为0。
draw 同样的,还在从ViewRootImpl中触发,然后回到View中。
1 2 3 4 5 6 7 8 9 10 11 12 13 14 15 16 17 18 19 20 21 22 23 24 25 26 27 28 29 30 31 32 private void performTraversals () {if (!isViewVisible) {else if (cancelAndRedraw) {else {if (!performDraw() && mActiveSurfaceSyncGroup != null ) {private boolean performDraw () {final boolean fullRedrawNeeded = mFullRedrawNeeded || mActiveSurfaceSyncGroup != null ;false ;true ;try {boolean canUseAsync = draw(fullRedrawNeeded, usingAsyncReport && mSyncBuffer);finally {false ;return true ;
最终触发到draw方法中,这里实际还没有到view中,因为这里涉及surface以及硬件加速,所以会有很多的流程,才会走到view中。
1
2
3
4
5
6
7
8
9
10
11
12
13
14
15
16
17
18
19
20
21
22
23
24
25
26
27
28
29
30
31
32
33
34
35
36
37
38
39
40
41
42
43
44
45
46
47
48
49
50
private boolean draw (boolean fullRedrawNeeded, boolean forceDraw) {final float appScale = mAttachInfo.mApplicationScale;final Rect dirty = mDirty;if (fullRedrawNeeded) {0 , 0 , (int ) (mWidth * appScale + 0.5f ), (int ) (mHeight * appScale + 0.5f ));boolean useAsyncReport = false ;if (!dirty.isEmpty() || mIsAnimating || accessibilityFocusDirty) {if (isHardwareEnabled()) {this );else {if (!drawSoftware(surface, mAttachInfo, xOffset, yOffset,return false ;return useAsyncReport;private boolean drawSoftware (Surface surface, AttachInfo attachInfo, int xoff, int yoff, boolean scalingRequired, Rect dirty, Rect surfaceInsets) {final Canvas canvas;try {if (mTranslator != null ) {0 );finally {return true ;
我们的View的绘制流程,实际上是属于软件绘制的,也就是drawSoftware,最终走到View的绘制流程中。注意在ViewGroup是没有重写draw的,因此最终走到的是在view中。
1
2
3
4
5
6
7
8
9
10
11
12
13
14
15
16
17
18
19
20
21
22
23
24
25
26
27
28
29
30
31
32
33
34
35
36
@CallSuper public void draw (Canvas canvas) {int saveCount;final int viewFlags = mViewFlags;boolean horizontalEdges = (viewFlags & FADING_EDGE_HORIZONTAL) != 0 ;boolean verticalEdges = (viewFlags & FADING_EDGE_VERTICAL) != 0 ;if (!verticalEdges && !horizontalEdges) {return ;
绘制流程一共分了7个步骤,其他的我们基本上不需要去关注,基本上只需要关注步骤3即可。通常情况下,如果我们是自定义ViewGroup是不需要关注绘制的,如果是自定义View,则需要重写onDraw,然后在画布中绘制我们想要的界面内容即可。这个方法在View中也是一个空实现,等待我们重写并进行自定义绘制。
总结 到这里,基本上View的绘制流程已经看完了,主要就是由ViewRootImpl触发的performTraversals,进入触发到View树的测量、布局、绘制三个流程。对于应用开发而言,如果是自定义ViewGroup,则重写onMeasure测量自身并触发子View的测量,然后重写onLayout触发子View的布局;如果是自定义View,则重写onMeasure测量自身,然后重写onDraw绘制自身内容即可。