在源码的注释的第一行中有这样一句话:CoordinatorLayout is a super-powered FrameLayout. 也就是什么都不做的话,是可以将他当做一个简单的FrameLayout来使用的,当然实际上我们肯定不会这样去使用的。从名字可以看到,CoordinatorLayout是一个协调布局、协作布局。即作为一个控制者,处理子View之间的交互关系。
CoordinatorLayout是用于操控子View的行为模式的,它将操控的能力全部抽取出来,组成一个静态内部类Behavior,通过Behavior来实现操控能力,也更方便拓展。因此,CoordinatorLayout必须搭配Behavior来使用,否则失去操控能力的它就变得及其简单,也就是源码注释中说的super-powered FrameLayout。
Behavior的能力 CoordinatorLayout将其所支持的各种功能都抽象出来,作为一个插件标准,所有人都可以依据这个插件标准,来使用它的各种能力。这个插件标准就是Behavior
说白了Android原生View之间的各种花样也不过布局绘制、事件操作等。而CoordinatorLayout所实现的就是一些常用的功能,如依赖关系 、测量布局 、Touch事件 、嵌套滑动 。
如何使用设置Behavior 1 2 3 4 public static abstract class Behavior <V extends View > {public Behavior () {}public Behavior (Context context, AttributeSet attrs) {}
Behavior有两个构造方法,一个是空参数的构造方法,一个是双参数的构造方法。对于熟悉自定义View的我们而言,双参数的构造方法一看就是对应从xml中实例化出来的。事实确实如此,空参数的构造方法一般都是手动去创建实例然后设置,而双参数的一般都是直接在xml中设置。
注意:
xml中设置 直接在xml中通过app:layout_behavior="xxx"给某个子view设置Behavior,其中xxx表示的是Behavior的类名。可以是缩略的如.MyBehavior,也可以是完整的如com.xx.test.MyBehavior。建议使用完整包名 ,毕竟当在xml中重定义package的时候,使用缩略名称会导致出错。
当通过xml声明的方式去设置Behavior的时候,会走双参数的构造方法,此时,可以通过xml属性向其设置参数,使用方式和自定义View的自定义属性是一样的。
1,在attrs.xml中定义属性和名称,和自定义view的做法一致 1 2 3 4 5 <resources > <declare-styleable name ="MovableButton_Behavior" > <attr name ="sex" format ="string" /> </declare-styleable > </resources >
1 2 3 4 5 6 7 8 9 10 11 12 13 14 15 <androidx.coordinatorlayout.widget.CoordinatorLayout xmlns:android ="http://schemas.android.com/apk/res/android" xmlns:app ="http://schemas.android.com/apk/res-auto" android:layout_width ="match_parent" android:layout_height ="match_parent" tools:context =".MainActivity" > <ImageView android:id ="@+id/image" android:layout_width ="wrap_content" android:layout_height ="wrap_content" app:layout_behavior =".behavior.AttrBehavior" app:sex ="aaaa" /> </androidx.coordinatorlayout.widget.CoordinatorLayout >
1 2 3 4 5 6 7 8 9 10 11 12 13 class AttrBehavior (init {val sex = it.getString(R.styleable.MovableButton_Behavior_sex)"xml中设置的app:sex属性值为:$sex " )
直接创建实例 若是不在xml中设置的话,则需要手动创建,然后设置给对应的View。这种方式稍微复杂一点点:需要首先拿到想要设置的Behavior的View,然后获取其布局属性CoordinatorLayout.LayoutParams,然后通过setBehavior方式设置。
1 2 3 4 5 6 7 8 9 10 override fun onCreate (savedInstanceState: Bundle ?) super .onCreate(savedInstanceState)val textView:TextView = findViewById(R.id.textView)val params = textView.layoutParamsif (params is CoordinatorLayout.LayoutParams) {
通过默认的Behavior设置 使用默认的设置,就是没有使用前两种方式设置的话才会使用默认的。以前是通过注解的方式去设置,这种方式需要自定义View,然后在其类名上通过@DefaultBehavior进行注解。
1 2 3 4 5 6 @DefaultBehavior(AttrBehavior::class) class MovableButton @JvmOverloads constructor (null ,Int = 0
注意:注解方式已经被标记为Deprecated,不再推荐使用了,现在推荐使用接口的方式来实现,即自定义的View通过实现
1 2 3 public interface AttachedBehavior {@NonNull Behavior getBehavior () ;
Behavior的功能 CoordinatorLayout抽取的比较狠,它将所有的操作都抽取到了Behavior中,本身基本上没有什么特殊功能了。也就是说如果离了Behavior,它就是一个FrameLayout了。
测量和布局 一个View的显示,通常经历三个步骤:测量、布局、绘制。而在Behavior中也能实现前两个步骤,这是因为CoordinatorLayout将其对子View的测量和布局的过程放在了Behavior中。它本身对于子View的布局就是单纯的叠加,也就是FrameLayout那样,如果想要特殊的测量和布局的话,则需要在Behavior中自己去实现了。
测量和布局对应的方法名称和View的方法非常类似,直接在Behavior中重写这两个方法实现自定义测量和布局,然后返回true即可。注意,必须返回true ,否则当前自定义不会生效。
1 2 3 4 5 6 7 8 9 10 11 12 13 14 boolean onMeasureChild ( @NonNull CoordinatorLayout parent, @NonNull V child, int parentWidthMeasureSpec, int widthUsed, int parentHeightMeasureSpec, int heightUsed ) boolean onLayoutChild ( @NonNull CoordinatorLayout parent, @NonNull V child, int layoutDirection )
相对而言,自定义测量onMeasureChild用的较少,因为默认情况下父布局会像FrameLayout那样去测量子View,这种测量方式基本上已经够用了,而onLayoutChild用的会多一些。
查看下面的实例代码:
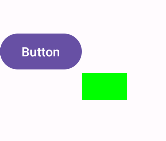
1 2 3 4 5 6 7 8 9 10 11 12 13 14 15 16 17 18 19 20 21 22 23 24 25 26 27 28 29 30 31 32 class LayoutBehavior (override fun onLayoutChild ( parent: CoordinatorLayout , child: ImageView , layoutDirection: Int ) Boolean {var target: Button? = null for (index in 0. .parent.childCount) {if (parent.getChildAt(index) is Button) {as Buttonbreak if (target == null ) {return false else {return true
然后在xml中,使用这个Behavior即可:
1 2 3 4 5 6 7 8 9 10 11 12 13 14 15 16 17 18 19 20 21 22 <?xml version="1.0" encoding="utf-8" ?> <androidx.coordinatorlayout.widget.CoordinatorLayout xmlns:android ="http://schemas.android.com/apk/res/android" xmlns:app ="http://schemas.android.com/apk/res-auto" xmlns:tools ="http://schemas.android.com/tools" android:layout_width ="match_parent" android:layout_height ="match_parent" tools:context =".MainActivity" > <Button android:layout_width ="wrap_content" android:layout_height ="wrap_content" android:layout_gravity ="center_vertical" android:text ="Button" tools:ignore ="HardcodedText" /> <ImageView android:layout_width ="50dp" android:layout_height ="30dp" android:background ="#00FF00d" app:layout_behavior ="com.example.viewdemo.LayoutBehavior" /> </androidx.coordinatorlayout.widget.CoordinatorLayout >
然后运行即可看到ImageView被放置在了Button的右下角:
布局依赖 Behavior可以实现两个子View之间的布局依赖的关系,当被依赖的View发生位置尺寸的变化或者被移除时,另一个View也会触发相应的操作。
1 2 3 4 5 public boolean layoutDependsOn ( @NonNull CoordinatorLayout parent, @NonNull V child, @NonNull View dependency )
首先,在Behavior中通过layoutDependsOn方法来确定依赖关系。方法的第三个参数就是需要依赖的View,该方法会调用多次,也就是说Behavior会遍历除了child外的其他view,然后通过这个方法去判断其是否是child的依赖。
例如parent有三个子View,其中有一个View设置了Behavior,那么layoutDependsOn方法会被调用两次,其中parent和child参数不变,每次变的是dependency参数。当返回true时,会记录该View,作为其依赖项,因此,依赖关系是一对多的 。
注意,在Behavior中,都是用parent代表父布局,child代表设置了Behavior的子View
1 2 3 4 5 public boolean onDependentViewChanged ( @NonNull CoordinatorLayout parent, @NonNull V child, @NonNull View dependency )
onDependentViewChanged则是依赖发生时调用的方法了,可以在这个方法中去声明child对依赖的响应行为。同样的,若是在这个方法中修改了child的尺寸或者位置,则需要返回true。
1 2 3 4 5 public void onDependentViewRemoved ( @NonNull CoordinatorLayout parent, @NonNull V child, @NonNull View dependency )
onDependentViewRemoved方法是发生在被依赖的View从父布局中移除的时候,也就是child失去了一个依赖的时候调用。
示例:
首先定义一个可移动的按钮MovableButton,因为依赖事件发生的前提是被依赖的View位置或者尺寸发生变化,因此这里需要有一个可以移动位置的View。下面定义一个MovableButton,并没有什么实质内容。
1 2 3 4 5 6 7 8 9 10 11 12 13 14 15 16 17 18 19 20 21 22 23 24 25 26 27 28 class MovableButton @JvmOverloads constructor (null private var mInitX = 0F private var mInitY = 0F private var mEventX = 0F private var mEventY = 0F override fun onTouchEvent (event: MotionEvent ?) Boolean {when (event?.actionMasked) {return super .onTouchEvent(event)
然后开始写Behavior,在Behavior中确定依赖关系并且定义相应的操作。
1 2 3 4 5 6 7 8 9 10 11 12 13 14 15 16 17 18 19 20 21 22 23 24 25 26 27 28 29 30 31 32 33 class BelowBehavior (override fun layoutDependsOn ( parent: CoordinatorLayout , child: View , dependency: View ) Boolean {return dependency is MovableButtonoverride fun onDependentViewChanged ( parent: CoordinatorLayout , child: View , dependency: View ) Boolean {return true override fun onDependentViewRemoved ( parent: CoordinatorLayout , child: View , dependency: View ) 0F
注意一点的是,在layoutDependsOn中确定依赖的条件是很简单的,只要View是MovableButton即可。实际中的条件应该更复杂一些的,因为简单的条件很容易形成多个依赖的View。
然后是在xml中使用Behavior,注意后面都是在xml中使用Behavior,因为比较简单:
1 2 3 4 5 6 7 8 9 10 11 12 13 14 15 16 17 18 19 20 <?xml version="1.0" encoding="utf-8" ?> <androidx.coordinatorlayout.widget.CoordinatorLayout xmlns:android ="http://schemas.android.com/apk/res/android" xmlns:app ="http://schemas.android.com/apk/res-auto" xmlns:tools ="http://schemas.android.com/tools" android:layout_width ="match_parent" android:layout_height ="match_parent" tools:context =".MainActivity" > <com.example.viewdemo.MovableButton android:layout_width ="wrap_content" android:layout_height ="wrap_content" android:text ="Button" tools:ignore ="HardcodedText" /> <ImageView android:layout_width ="50dp" android:layout_height ="30dp" android:background ="#00FF00" app:layout_behavior ="com.example.viewdemo.BelowBehavior" /> </androidx.coordinatorlayout.widget.CoordinatorLayout >
最后是效果图如下:
事件拦截处理 在View的事件分发中,事件都是先分发给最里层的子View的,当子View决定不处理touch事件的时候,外层的父布局才会得到处理事件的机会。但这也不是一定的,因为父布局中有一个方法可以用来拦截事件,这样事件就会直接交给父布局进行处理,而不会传递给子View了。
CoordinatorLayout作为一个父布局(ViewGroup)一定也是有这个拦截的功能的,但是同样的,它本身也没去实现拦截的机制,而是将这个功能抽取到Behavior中,由Behavior去决定CoordinatorLayout是否拦截此次的事件。当决定拦截了事件后,同样的CoordinatorLayout也不去处理这些事件,而是将这些事件传递给决定拦截事件的这些Behavior中,由Behavior去处理。
1 2 3 4 5 6 7 8 9 10 11 public boolean onInterceptTouchEvent ( @NonNull CoordinatorLayout parent, @NonNull V child, @NonNull MotionEvent ev ) public boolean onTouchEvent ( @NonNull CoordinatorLayout parent, @NonNull V child, @NonNull MotionEvent ev )
和ViewGroup一样的方法,通过onInterceptTouchEvent进行拦截,然后在onTouchEvent中去处理。Behavior是服务child的,因此这里的事件拦截也仅是为了child而拦截的。让child在事件分发之前就能提前拦截到触摸事件。
嵌套滑动 Behavior还有一个比较常用的就是嵌套滑动。嵌套滑动的设计能够将一次事件流交给多个View去处理,从而可以让滑动更加流畅更加符合我们的期望。它使用两套接口来实现这种功能,分别是NestedScrollingChild3和NestedScrollingParent3,对应着子View和父View,当然也可以同时实现这两个接口,这样就可以为所欲为了。
虽然CoordinatorLayout也实现了NestedScrollingParent3接口,但是它并不是像传统的那种嵌套滑动一样来处理滑动事件,而是将滑动事件委托给了Behavior,也就是在嵌套滑动中,实际上是Behavior来作为parent处理滑动事件的。也就是说,CoordinatorLayout中的嵌套滑动并不需要嵌套,同时,由于在嵌套滑动中作为parent的是Behavior,所以实际上想要作为parent的子View只需要设置Behavior即可,而不用去实现NestedScrollingParent3接口。
总之,CoordinatorLayout使用嵌套滑动逻辑实现了一套不是嵌套滑动的嵌套滑动
注意,嵌套滑动必须由NestedScrollingChild3发起,RecyclerView就实现了这个接口。
1 2 3 4 5 6 7 8 public boolean onStartNestedScroll ( @NonNull CoordinatorLayout coordinatorLayout, @NonNull V child, @NonNull View directTargetChild, @NonNull View target, @ScrollAxis int axes, @NestedScrollType int type )
这是嵌套滑动开始的方法,当发生嵌套滑动的时候,会先调用这个方法,判断Behavior是否需要参与此次的滑动,返回true表示参与这次滑动,才会有后续的方法调用,否则后续的事件都不会再回调到这个Behavior中。
其中前两个参数不用说了,第三个参数directTargetChild是发生滑动的View在CoordinatorLayout中的直接子布局,而target表示的是发生滑动的那个View。当target直接出现在CoordinatorLayout中的时候,这时候的directTargetChild和target是同一个对象。如下布局中,directTargetChild就是FrameLayout,而target是RecyclerView。
1 2 3 4 5 6 7 8 <androidx.coordinatorlayout.widget.CoordinatorLayout... > <FrameLayout... > <androidx.recyclerview.widget.RecyclerView... /> </FrameLayout > </androidx.coordinatorlayout.widget.CoordinatorLayout >
最后两个参数是一个是滚动的方向,一个是滚动的类型。axes表示滑动的方向,有水平和垂直两种类型,取值为ViewCompat#SCROLL_AXIS_HORIZONTAL和ViewCompat#SCROLL_AXIS_VERTICAL。而type表示滑动的类型,有触摸滚动和非触摸滚动(惯性滚动),取值为ViewCompat#TYPE_TOUCH和ViewCompat#TYPE_NON_TOUCH。当Behavior想要参与此次的嵌套滑动的时候,需要返回true。
1 2 3 4 5 6 7 8 public void onNestedScrollAccepted ( @NonNull CoordinatorLayout coordinatorLayout, @NonNull V child, @NonNull View directTargetChild, @NonNull View target, @ScrollAxis int axes, @NestedScrollType int type )
onNestedScrollAccepted的参数和onStartNestedScroll是一样的,这个方法是当onStartNestedScroll返回true的时候调用的,他与onStartNestedScroll是绑定在一起的,每次onStartNestedScroll返回true都会调用一次这个方法。可以在该方法中去处理嵌套滑动的前置准备,如初始化状态等;当然,也可以选择在onStartNestedScroll就初始化状态。
1 2 3 4 5 6 7 8 9 10 11 12 13 14 15 16 17 18 19 20 21 public void onNestedPreScroll ( @NonNull CoordinatorLayout coordinatorLayout, @NonNull V child, @NonNull View target, int dx, int dy, @NonNull int [] consumed, @NestedScrollType int type ) public void onNestedScroll ( @NonNull CoordinatorLayout coordinatorLayout, @NonNull V child, @NonNull View target, int dxConsumed, int dyConsumed, int dxUnconsumed, int dyUnconsumed, @NestedScrollType int type, @NonNull int [] consumed )
上面两个方法才是真正滑动的时候回调的方法。在发生嵌套滑动并且Behavior接受了这次滑动后,会先调用onNestedPreScroll方法。注意这个方法是发生在Behavior中的,也就是说,当有滑动事件的时候,是优先传递给Behavior去处理的。其中参数dx和dy表示的是滑动的距离,而数组consumed的长度为2,表示的是Behavior消耗的滑动距离。consumed[0]为对dx的消耗,consumed[1]为对dy的消耗,当Behavior消耗滑动后,需要手动的将消耗的多少填充到数组中。
当Behavior处理完后,剩余的事件会传递给target去处理,当然这时候的处理跟我们无关了,是由target本身的逻辑去处理了。而当target滚动结束后,剩下的事件又会传递到parent中进而传递给Behavior的onNestedScroll方法。该方法的中间四个参数没什么可说的,从名字就可以看出是dx和dy的已消耗的和未消耗的值。consumed数组也是一样的,存放消耗的事件。注意的是,此时consumed数据可能是已经有值的,因此我们消耗后,需要进行叠加而不是赋值。例如消耗deltaY,则应该consumed[1] += deltaY。
1 2 3 4 5 6 7 8 9 10 11 12 13 14 15 16 public boolean onNestedPreFling ( @NonNull CoordinatorLayout coordinatorLayout, @NonNull V child, @NonNull View target, float velocityX, float velocityY ) public boolean onNestedFling ( @NonNull CoordinatorLayout coordinatorLayout, @NonNull V child, @NonNull View target, float velocityX, float velocityY, boolean consumed )
当子View发生惯性滑动也就是fling的时候,同样是先传递给Behavior。也就是onNestedPreFling方法,Behavior需要在这个方法中去判断是否需要消耗这次的惯性滑动,若是需要的话则返回true。然后就是再交还给子View去进行判断是否需要显示overScroll,然后再通过onNestedFling传递回Behavior中进行真正的惯性滑动处理。其中参数consumed表示嵌套子View(发起滚动的子View)是否消耗此次惯性滑动,若是Behavior需要消耗此次滚动,则需要返回true。
这是NestedScrollingParent中的机制,而在NestedScrollingParent2/3中,已经取消了这种惯性滑动的处理方式,而是采用Child去消耗滑动,产生的滑动再次分发的形式。因此,实际上这两个方法都不用重写的,直接保持默认的实现就行了 。
1 2 3 4 5 6 public void onStopNestedScroll ( @NonNull CoordinatorLayout coordinatorLayout, @NonNull V child, @NonNull View target, @NestedScrollType int type )
在滚动结束后,会调用onStopNestedScroll方法,可以在这个方法中去做一些收尾工作。所以嵌套滑动一共涉及到七个方法,滑动刚开始的两个方法,滑动过程中的两个方法,惯性滑动的两个方法,以及收尾的一个方法。并且,滑动事件的顺序都是子View->Behavior->子View->Behavior。因此滑动过程和惯性滑动过程都是两个方法,一个是第一次开始处理,一个是子View处理后剩下的再去处理。
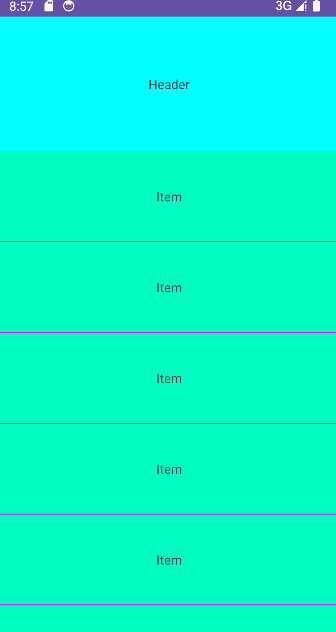
下面实现一个示例,给RecyclerView添加一个Header:
1 2 3 4 5 6 7 8 9 10 11 12 13 14 15 16 17 18 19 20 21 22 23 24 25 26 <?xml version="1.0" encoding="utf-8" ?> <androidx.coordinatorlayout.widget.CoordinatorLayout xmlns:android ="http://schemas.android.com/apk/res/android" xmlns:app ="http://schemas.android.com/apk/res-auto" xmlns:tools ="http://schemas.android.com/tools" android:layout_width ="match_parent" android:layout_height ="match_parent" tools:context =".MainActivity" > <TextView android:layout_width ="match_parent" android:layout_height ="150dp" android:background ="#00FFFF" android:gravity ="center" android:text ="Header" app:layout_behavior =".NestedBehavior" /> <androidx.recyclerview.widget.RecyclerView android:id ="@+id/recyclerView" android:layout_width ="match_parent" android:layout_height ="match_parent" android:orientation ="vertical" app:layoutManager ="androidx.recyclerview.widget.LinearLayoutManager" app:layout_behavior =".ToBottomBehavior" tools:listitem ="@layout/item_text" /> </androidx.coordinatorlayout.widget.CoordinatorLayout >
整体布局如上所示,要实现添加Header的效果,需要两步,一是将RecyclerView放置在Header的下面,一是跟随滑动。由于CoordinatorLayout的默认布局效果是堆叠的方式,所以需要我们自己去进行布局,这里定义一个ToBottomBehavior,作用与RecyclerView,用于让其一直处于Header的下方:
1 2 3 4 5 6 7 8 9 10 11 12 13 14 15 16 17 18 19 20 21 22 23 24 25 26 27 28 29 30 31 32 33 34 35 36 37 38 class ToBottomBehavior (context: Context,attr: AttributeSet) : Behavior<RecyclerView>(context, attr) {override fun onLayoutChild ( parent: CoordinatorLayout , child: RecyclerView , layoutDirection: Int ) Boolean {if (parent.childCount < 2 ) {return false val first = parent.getChildAt(0 )0 , first.measuredHeight, first.measuredWidth, child.measuredHeight)return true override fun layoutDependsOn ( parent: CoordinatorLayout , child: RecyclerView , dependency: View ) Boolean {return dependency is TextViewoverride fun onDependentViewChanged ( parent: CoordinatorLayout , child: RecyclerView , dependency: View ) Boolean {0 ,return true
然后再定义一个NestedBehavior,让Header跟随RecyclerView进行滑动:
1 2 3 4 5 6 7 8 9 10 11 12 13 14 15 16 17 18 19 20 21 22 23 24 25 26 27 28 29 30 31 32 33 34 35 36 37 38 39 40 41 42 43 44 45 46 47 48 49 50 51 52 53 54 55 56 57 58 59 60 61 62 63 64 65 66 67 68 69 70 71 72 73 class NestedBehavior (null override fun onStartNestedScroll ( coordinatorLayout: CoordinatorLayout , child: View , directTargetChild: View , target: View , axes: Int , type: Int ) Boolean {return axes == ViewCompat.SCROLL_AXIS_VERTICALoverride fun onNestedPreScroll ( coordinatorLayout: CoordinatorLayout , child: View , target: View , dx: Int , dy: Int , consumed: IntArray , type: Int ) val translationY = child.translationYif (-translationY >= child.measuredHeight || dy < 0 ) {return val desireHeight = translationY + child.measuredHeightif (dy <= desireHeight) {1 ] = dyelse {1 ] = desireHeight.toInt()override fun onNestedScroll ( coordinatorLayout: CoordinatorLayout , child: View , target: View , dxConsumed: Int , dyConsumed: Int , dxUnconsumed: Int , dyUnconsumed: Int , type: Int , consumed: IntArray ) val translationY = child.translationYif (translationY >= 0 || dyUnconsumed > 0 ) {return if (dyUnconsumed > translationY) {1 ] += dyUnconsumedelse {1 ] += child.translationY.toInt()0F
然后随便设置一下RecyclerView的Adapter等,效果如下:
总结 首先,Behavior是一个插件,它是CoordinatorLayout抽取出来的一个标准。CoordinatorLayout将本身的各种能力抽取到了Behavior中,在需要的时候去加载它从而实现某些交互。
其次,Behavior一共有四种能力:测量布局,位置依赖,事件拦截,嵌套滑动 。其中依赖和嵌套滑动用的是最多的,然后是布局和测量,最后才是touch。
当学会了Behavior的各个方法的使用后,就可以设计出各种花里胡哨的操作了,也就学会了Behavior了。