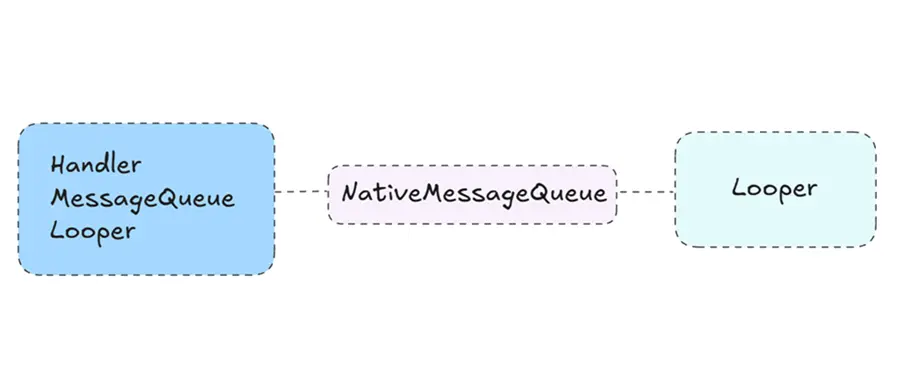
Handler是我们非常熟悉的一个组件,它的主要作用就是进行线程间的交互,通常是主线程与其他工作线程间的交互。这套消息机制在应用开发中用的是最多的,我们使用它来实现切换主线程、发送延时消息等。它主要由Handler、Looper、MessageQueue三个组件组成,其中Handler负责发送和处理消息,Looper负责循环读取消息,MessageQueue负责存储消息。
简单介绍 整套消息机制我们应该非常熟悉了,具体的使用就不再赘述,这里只简单介绍下各个组件的作用。本文基于Android 13源码。
Handler Handler负责发送消息和处理消息,发送的消息主要是普通消息和Runnable消息,通常使用post、postAtTime、postDelayed发送Runnable消息,通过sendEmptyMessage、sendMessage、sendMessageAtTime、sendMessageDelayed发送普通消息。
这些消息被发送时,都会在消息上指明target为当前Handler,而等到消息执行时,就会将消息指派给它对应的Handler进行处理。
Message Message是消息的载体,对于普通消息,可以直接通过它的what属性进行区分,通过arg1和arg2承载简单的数据,通过obj承载复杂的对象数据;对于Runnable消息,通过它的callback属性进行承载。同时,Message是被设计成单链表结构的,以及一个消息池,被用过的Message就会被放在消息池中等待复用,消息池就是一个单链表结构。因此如果我们创建Message的时候,最好通过Message.obtain方法创建而不是直接new以复用Message。
Looper Looper是一个消息机制中的驱动模块,它会循环读取消息队列中的消息,然后将其分发给对应的Handler进行处理。当消息队列为空或者没有可执行的消息时,它会阻塞当前线程,当有了可执行的消息时会被唤醒继续循环读取。
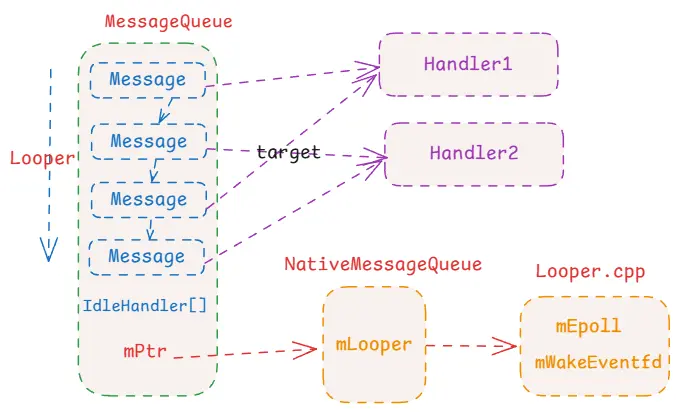
MessageQueue 消息队列MessageQueue,主要作用是存储消息,各个Handler发送的消息都会进入消息队列,并且按照消息的执行时间进行排序,时间靠前的排在前面。当Looper获取消息时,从前向后读取消息,如果消息的执行时间在当前时间之后,就会阻塞一直到执行时间后恢复。
Java层源码 我们知道Handler是可以跨线程进行交互的,那么如何跨线程呢?首先线程间的数据本身就是可以共享的,我们可以在某个线程中定义一个数据结构,然后在另一个线程中向这个数据结构中写入数据,这样两个线程就可以交换数据了。生产者消费者模式就是这个原理,而Handler消息机制,本质上也是这个原理。
在Handler消息机制中,MessageQueue就是这个共享的数据结构,它存在于Looper中,也就是说如果我们想要在某个线程中启用Handler消息机制,则必须创建一个Looper。
1
2
3
4
private Looper (boolean quitAllowed) {new MessageQueue (quitAllowed);
在Looper的构造方法中会创建一个MessageQueue来接受数据,但是它是私有方法,无法直接创建,我们正常是通过prepare方法创建。
1
2
3
4
5
6
7
8
9
10
11
12
13
@UnsupportedAppUsage static final ThreadLocal<Looper> sThreadLocal = new ThreadLocal <Looper>();public static void prepare () {true );private static void prepare (boolean quitAllowed) {if (sThreadLocal.get() != null ) {throw new RuntimeException ("Only one Looper may be created per thread" );new Looper (quitAllowed));
从prepare中可以看到,如果当前线程中已经创建过了Looper,则直接抛出异常,否则创建Looper并存入到ThreadLocal中,使得一个线程中只存在一个Looper,从而保障了一个线程只有一个MessageQueue。ThreadLocal是线程局部变量,它通常会被定义成静态变量供多个线程存储和获取变量的,本质上就是拿到线程的ThreadLocalMap,然后往里面存数据就行了,这个不需要过多的了解。
1
2
3
4
5
6
7
8
9
10
11
12
13
14
15
16
17
18
19
public static void loop () {final Looper me = myLooper();if (me == null ) {throw new RuntimeException ("No Looper; Looper.prepare() wasn't called on this thread." );true ;for (;;) {if (!loopOnce(me, ident, thresholdOverride)) {return ;public static @Nullable Looper myLooper () {return sThreadLocal.get();
创建完Looper之后,就通过loop()去循环读取MessageQueue中的消息了。注意loop是个死循环,当前线程的逻辑会一直卡在这里无法再做别的事情了。因此,我们必须在prepare和loop之间创建一个或多个Handler,然后将Handler提供出去以便其他线程向当前线程中发送消息,通常的写法如下:
1
2
3
4
5
6
7
8
9
10
11
12
class MyThread extends Thread {private Handler mHandler;@Override public void run () {super .run();new Handler (Looper.myLooper());
但是主线程不是我们启动的,我们又该如何获取到Handler,如何创建Looper,然后向主线程发消息呢?
1
2
3
4
5
6
7
8
9
10
11
12
13
@UnsupportedAppUsage private static Looper sMainLooper;@Deprecated public static void prepareMainLooper () {false );synchronized (Looper.class) {if (sMainLooper != null ) {throw new IllegalStateException ("The main Looper has already been prepared." );
主线程走的是另一个方法prepareMainLooper,当应用的主线程启动后,会调用prepareMainLooper创建Looper,并赋值给静态变量sMainLooper。因此对于应用而言,sMainLooper是不会为空的,我们也可以通过它来创建Handler。
1 private Handler mMainHandler = new Handler (Looper.getMainLooper);
然后便是Handler了,由于Handler是用于发送消息的,所以Handler必须能够获取到Looper以便向它的MessageQueue中发送消息。因此,Handler构造方法中,必须传入Looper。
1 2 3 4 5 6 7 8 9 10 11 12 13 14 15 16 17 18 19 20 21 22 23 24 25 26 27 28 29 30 31 32 33 34 35 36 37 38 39 40 41 42 43 44 @Deprecated public Handler () {this (null , false );public Handler (@Nullable Callback callback, boolean async) {if (mLooper == null ) {throw new RuntimeException ("Can't create handler inside thread " + Thread.currentThread()" that has not called Looper.prepare()" );false ;public Handler (@NonNull Looper looper) {this (looper, null , false );@UnsupportedAppUsage public Handler (@NonNull Looper looper, @Nullable Callback callback, boolean async) {this (looper, callback, async, false );public Handler (@NonNull Looper looper, @Nullable Callback callback, boolean async, boolean shared) {
对于空参数的构造方法,则直接从当前线程获取Looper,获取不到直接抛异常。当然,不带Looper的构造方法已经被标记为Deprecated了,再去掉其他的hide的方法等,我们实际使用中通常用的是public Handler(@NonNull Looper looper)这个构造方法。Handler有很多的发送消息的方法,但最终都是走到了同一个方法中去发送数据。并且最终也是通过queue.enqueueMessage加入到消息队列中。
1
2
3
4
5
6
7
8
9
10
11
private boolean enqueueMessage (@NonNull MessageQueue queue, @NonNull Message msg, long uptimeMillis) {this ;if (mAsynchronous) {true );return queue.enqueueMessage(msg, uptimeMillis);
虽然Handler有很多的发送消息的方法,但最终也是调用了queue.enqueueMessage将消息传入到消息队列中。所以,它的这些方法只是为了方便我们使用而已,将一些参数进行拆分,方便我们快速编码。不管发送时传入的参数是什么,最终都会被构建成一个Message对象,这个Message就是消息的载体,它代表了一个消息。因为消息会有很多很多,为了避免频繁的创建和销毁,它被设计成一个单链表结构,并设计了一个消息池,消息池中存放的是用于重复利用的Message,他们以单链表的形式存在。因此,我们如果要直接发送Message的话,切记不要直接new,而是应该通过Message.obtain方法从消息池中获取,以达成重复利用的目的。
1
2
3
4
5
6
7
8
9
10
11
12
13
14
15
16
17
18
19
20
21
22
23
24
25
26
27
28
29
30
31
32
public final class Message implements Parcelable {public int what;public int arg1;public int arg2;public Object obj;@UnsupportedAppUsage int flags;@UnsupportedAppUsage @VisibleForTesting(visibility = VisibleForTesting.Visibility.PACKAGE) public long when ;@UnsupportedAppUsage @UnsupportedAppUsage @UnsupportedAppUsage
消息的结构比较简单,一个用于区分消息的参数,三个用于携带数据的参数,以及一个用于存储可执行代码块的参数,这里不需要详细解释,接下来继续看消息进入消息队列的逻辑。注意这里的消息队列MessageQueue只是名字叫做消息队列,它的结构实际不是一个队列的数据结构,而是一个以消息执行时间排序的Message为节点的单链表结构。
1
2
3
4
5
6
7
8
9
10
11
12
13
14
15
16
17
18
19
20
21
22
23
24
25
26
27
28
29
30
31
32
33
34
35
36
37
38
39
40
41
42
43
44
45
46
47
48
49
50
51
52
53
54
55
boolean enqueueMessage (Message msg, long when ) {if (msg.target == null ) {throw new IllegalArgumentException ("Message must have a target." );synchronized (this ) {if (msg.isInUse()) {throw new IllegalStateException (msg + " This message is already in use." );if (mQuitting) {IllegalStateException e = new IllegalStateException (" sending message to a Handler on a dead thread" );return false ;when = when ;Message p = mMessages;boolean needWake;if (p == null || when == 0 || when < p.when ) {else {null && msg.isAsynchronous();for (;;) {if (p == null || when < p.when ) {break ;if (needWake && p.isAsynchronous()) {false ;if (needWake) {return true ;
整体看下来,在消息入队列时做了两件事:一是按照Message.when的时间顺序将新的Message插入到消息队列中,一是决定是否唤醒Looper线程。如果消息队列中没有消息并且当前Looper线程是阻塞的,则唤醒Looper。另外如果消息队列中有消息,但是Looper是阻塞的并且当前的消息是异步消息,则也唤醒Looper。
前面我们看到的MessageQueue插入数据的逻辑,实际上是发生在Handler.sendMessage所在的线程。因为我们开启Looper循环后,Looper所在的线程就会一直循环从MessageQueue中取数据,取不到时就会阻塞。因此,在MQ收到消息后,会选择是否唤起Looper来处理新来的消息。重新看回Looper.loop方法:
1
2
3
4
5
6
7
8
public static void loop () {for (;;) {if (!loopOnce(me, ident, thresholdOverride)) {return ;
也就是说,Looper开启后就会一直死循环读取,而读取的逻辑则是发生在loopOnce中:
1
2
3
4
5
6
7
8
9
10
11
12
13
14
15
16
17
18
19
20
21
22
23
24
25
26
27
28
29
30
31
32
33
34
35
36
37
38
39
40
41
42
43
44
45
46
47
48
49
50
51
private static boolean loopOnce (final Looper me, final long ident, final int thresholdOverride) {Message msg = me.mQueue.next();if (msg == null ) {return false ;final Printer logging = me.mLogging;if (logging != null ) {">>>>> Dispatching to " + msg.target + " " ": " + msg.what);final Observer observer = sObserver;if (observer != null ) {try {if (observer != null ) {catch (Exception exception) {if (observer != null ) {throw exception;finally {if (logging != null ) {"<<<<< Finished to " + msg.target + " " + msg.callback);return true ;
前面的loopOnce从名字也能看出来是循环一次的意思,实际它的逻辑也是如此。首先通过MessageQueue.next取出一个消息,注意该消息一定不为空,因为取不到消息的时候会阻塞住,直到取到消息才会返回,当然如果Looper被退出的话是会返回null的,然后就是通过Message对应的target去dispatchMessage。从这里也能看到线程是如何切换的了,首先在其他线程通过Handler发送消息,这个消息会是一个数据或者一个代码块Runnable,然后被包装成Message,最终在Looper线程中通过Handler.dispatchMessage处理。
因此我们接下来的关注点有两点:一是MessageQueue.next是如何取消息的,一是Handler.dispatchMessage是如何处理消息的,先看next:
1
2
3
4
5
6
7
8
9
10
11
12
13
14
15
16
17
18
19
20
21
22
23
24
25
26
27
28
29
30
31
32
33
34
35
36
37
38
39
40
41
42
43
44
45
46
47
48
49
50
51
52
53
54
55
56
57
58
59
60
61
62
63
64
65
66
67
68
69
70
71
72
73
74
75
76
77
78
79
80
81
82
83
Message next () {final long ptr = mPtr;if (ptr == 0 ) {return null ;int pendingIdleHandlerCount = -1 ;int nextPollTimeoutMillis = 0 ;for (; ; ) {synchronized (this ) {final long now = SystemClock.uptimeMillis();Message prevMsg = null ;Message msg = mMessages;if (msg != null && msg.target == null ) {do {while (msg != null && !msg.isAsynchronous());if (msg != null ) {if (now < msg.when ) {int ) Math.min(msg.when - now, Integer.MAX_VALUE);else {false ;if (prevMsg != null ) {else {null ;return msg;else {1 ;if (mQuitting) {return null ;for (int i = 0 ; i < pendingIdleHandlerCount; i++) {final IdleHandler idler = mPendingIdleHandlers[i];null ; boolean keep = false ;try {catch (Throwable t) {"IdleHandler threw exception" , t);if (!keep) {synchronized (this ) {
上面的逻辑比较长,详细的注释也在其中了。这里有一段逻辑是当Message的target为空时,后面只会去取isAsynchronous的异步消息,这里这种target为空的消息被称为消息屏障,它的作用就是屏蔽它之后的消息,但是无法屏蔽异步消息。整体逻辑就是:取第一个Message,如果是消息屏障的话,继续找它后面的异步消息,反正就是找到最近的一个消息,然后消息不能执行的话就阻塞,否则就返回。
最后还有一个IdleHandler,它是空闲消息,当消息队列处于空闲状态时才会执行。空闲状态是指:消息队列中没有消息、消息队列中有消息但是未到执行时间、消息队列中有消息但是被消息屏障给屏蔽了并且没有可执行的异步消息。注意这里的next方法中取消息的逻辑是一个死循环:先取消息,没有可执行的消息时会计算需要阻塞的时长,然后再去执行IdleHandler消息;然后再到循环时,会再次找消息并计算阻塞时长,然后受pendingIdleHandlerCount参数的影响这次不会再执行IdleHandler了;然后再次循环进去阻塞状态。之所以这样循环,是因为IdleHandler也是执行在Looper线程的,考虑到它的执行可能会消耗时间,因此需要在它执行之后重新计算阻塞时长。
接下来再看看Handler是如何执行消息的,即msg.target,.dispatchMessage
1
2
3
4
5
6
7
8
9
10
11
12
13
14
15
16
17
18
19
public void dispatchMessage (@NonNull Message msg) {if (msg.callback != null ) {else {if (mCallback != null ) {if (mCallback.handleMessage(msg)) {return ;private static void handleCallback (Message message) {
普通消息会被分为数据消息和代码块消息,代码块的消息会被直接执行掉,从而实现了跨线程,因为代码块是在其他线程发送的,但是执行时却是在Looper的线程执行的。而数据消息则是由用户自己去处理,使用示例如下:
1 2 3 4 5 6 7 8 9 10 11 12 13 14 15 16 17 18 19 20 21 22 23 24 25 26 27 28 29 private Handler mHandler = new Handler (Looper.getMainLooper(), new Handler .Callback() {@Override public boolean handleMessage (@NonNull Message msg) {boolean consumed = false ;switch (msg.what) {case 1 :true ;break ;default :break ;return consumed;private Handler mHandler2 = new Handler (Looper.getMainLooper()) {@Override public void handleMessage (@NonNull Message msg) {switch (msg.what) {case 1 :true ;break ;default :break ;
当然,如果不发送数据消息的话,直接使用new Handler(Looper)即可。
小结 在Handler消息机制中,绑定了Looper的Handler可以在任意的线程中向MessageQueue中发送消息,Looper负责循环驱动来读取消息,并在自己的线程内处理消息。其中消息分为三类:
普通消息:普通消息又根据msg.isAsynchronous分为异步消息和同步消息,他们之间的差异就是异步消息不会被消息屏障给屏蔽掉。不管是同步消息还是异步消息,他们又根据msg.callback分为代码块消息和数据消息,如果callback不为空说明是代码块消息,会直接执行。数据消息则是由用户自己进行处理,可根据what来区分消息。 消息屏障:msg.target为空就代表它是一个消息屏障,它的作用就是屏蔽它后面的消息。一般用来保证重要消息的执行,如View在绘制时就会发送一个消息屏障屏蔽掉其他消息,以保障绘制的顺利完成。 空闲消息:IdleHandler并不是一个Message,他在MessageQueue中也是单独用一个集合存储的。它只会在消息队列空闲的时候执行,时机无法控制,因此适合处理一些不重要的东西。 Native层源码 前面说到的是Java层的整个机制的源码,可以看到在阻塞和唤醒的地方都是调用的native的方法:
1 2 3 4 5 6 7 8 9 10 11 12 13 14 15 16 17 18 19 20 21 22 23 24 25 26 27 28 29 30 MessageQueue(boolean quitAllowed) {next () {for (;;) {boolean enqueueMessage (Message msg, long when ) {synchronized (this ) {if (needWake) {return true ;private native static long nativeInit () ;private native static void nativeDestroy (long ptr) ;@UnsupportedAppUsage private native void nativePollOnce (long ptr, int timeoutMillis) ; private native static void nativeWake (long ptr) ;
可以看到,这一系列的方法都是native方法,源码实现都是在JNI中,并且他们不是通过System.load加载的,而是在native层动态加载的,基本上所有的系统JNI都是在AndroidRuntime(frameworks/base/core/jni/AndroidRuntime.cpp)中动态加载的。我们正常找对应的JNI文件的时候,可以直接全局搜文件名,文件名的规则就是包名+类名,如MessageQueue对应的JNI文件就是android_os_MessageQueue.cpp(frameworks/base/core/jni/android_os_MessageQueue.cpp)。
找到了对应的文件,那么我们直接看nativeInit方法,它是在构造MessageQueue的时候调用的,返回值是一个long类型的值。
1
2
3
4
5
6
7
8
9
10
11
static jlong android_os_MessageQueue_nativeInit (JNIEnv* env, jclass clazz) new NativeMessageQueue ();if (!nativeMessageQueue) {jniThrowRuntimeException (env, "Unable to allocate native queue" );return 0 ;incStrong (env);return reinterpret_cast <jlong>(nativeMessageQueue);
即创建了一个NativeMessageQueue,然后增强了它的强引用,避免被销毁,然后返回了地址指针给到Java层。这里的NativeMessageQueue实际并不是个消息队列,它只是名字叫做这个耳机,内部也没什么结构逻辑,只是持有一个sp<Looper>对象。注意这里的Looper并不是Java层的,而是C++的Looper。
1 2 3 4 5 6 7 8 NativeMessageQueue::NativeMessageQueue () :mPollEnv (NULL ), mPollObj (NULL ), mExceptionObj (NULL ) {getForThread ();if (mLooper == NULL ) {new Looper (false );setForThread (mLooper);
看得出来,Looper和Java层的Looper是一样的,一个线程中只会存在一个。这里的逻辑就是先去根据当前线程获取Looper,获取不到的话就去创建一个Looper,然后保存起来。Looper的位置在system/core/libutils/Looper.cpp、system/core/include/utils/Looper.h。
1 2 3 4 5 6 7 8 9 10 11 12 13 14 15 16 17 18 19 20 21 22 23 24 25 26 27 28 29 30 31 32 33 34 35 Looper::Looper (bool allowNonCallbacks)mAllowNonCallbacks (allowNonCallbacks),mSendingMessage (false ),mPolling (false ),mEpollRebuildRequired (false ),mNextRequestSeq (WAKE_EVENT_FD_SEQ + 1 ),mResponseIndex (0 ),mNextMessageUptime (LLONG_MAX) {reset (eventfd (0 , EFD_NONBLOCK | EFD_CLOEXEC));LOG_ALWAYS_FATAL_IF (mWakeEventFd.get () < 0 , "Could not make wake event fd: %s" , strerror (errno));rebuildEpollLocked ();void Looper::rebuildEpollLocked () if (mEpollFd >= 0 ) {reset ();reset (epoll_create1 (EPOLL_CLOEXEC));createEpollEvent (EPOLLIN, WAKE_EVENT_FD_SEQ);int result = epoll_ctl (mEpollFd.get (), EPOLL_CTL_ADD, mWakeEventFd.get (), &wakeEvent);for (const auto & [seq, request] : mRequests) {createEpollEvent (request.getEpollEvents (), seq);int epollResult = epoll_ctl (mEpollFd.get (), EPOLL_CTL_ADD, request.fd, &eventItem);
看到这里应该就很熟悉了,前面在Handler唤起的基础 中详细介绍过eventfd和epoll机制,其中epoll是可以监控多个eventfd的,每个fd都能唤醒epoll,这里默认的唤醒的fd是mWakeEventfd。所以初始化的方法也就简洁明了了,创建了一个Looper,然后在Looper中整了eventfd和epoll。epoll_wait等待eventfd的状态变化:
1
2
3
4
5
6
7
8
9
10
11
12
13
14
15
16
17
18
19
20
static void android_os_MessageQueue_nativePollOnce (JNIEnv* env, jobject obj, jlong ptr, jint timeoutMillis) reinterpret_cast <NativeMessageQueue*>(ptr);pollOnce (env, obj, timeoutMillis);void NativeMessageQueue::pollOnce (JNIEnv* env, jobject pollObj, int timeoutMillis) pollOnce (timeoutMillis);NULL ;NULL ;if (mExceptionObj) {Throw (mExceptionObj);DeleteLocalRef (mExceptionObj);NULL ;
首先就是在nativeInit的时候构建了NativeMessageQueue,然后将指针传入到了Java层保存在Java层的MessageQueue.mPtr中。后续所有的操作都是与mPtr相关的,从Java再到native,将mPtr指针地址再转换成NativeMessageQueue进行操作。如nativePollOnce就是最终走到Looper.pollOnce。
1 2 3 4 5 6 7 8 9 10 11 12 13 14 15 16 17 18 19 20 21 22 23 24 25 26 27 28 29 30 31 32 33 34 35 36 37 38 39 40 41 42 43 44 45 46 47 48 49 50 51 52 53 54 55 56 57 58 59 60 61 62 63 64 65 66 67 68 69 70 71 72 73 74 75 76 77 78 79 80 81 82 83 84 85 86 87 88 89 90 91 92 93 94 95 96 97 98 99 inline int pollOnce (int timeoutMillis) return pollOnce (timeoutMillis, nullptr , nullptr , nullptr );int Looper::pollOnce (int timeoutMillis, int * outFd, int * outEvents, void ** outData) int result = 0 ;for (;;) {if (result != 0 ) {return result;pollInner (timeoutMillis);int Looper::pollInner (int timeoutMillis) int result = POLL_WAKE;clear ();0 ;true ;struct epoll_event eventItems[EPOLL_MAX_EVENTS];int eventCount = epoll_wait (mEpollFd.get (), eventItems, EPOLL_MAX_EVENTS, timeoutMillis);false ;if (eventCount < 0 ) {if (errno == EINTR) {goto Done;goto Done;if (eventCount == 0 ) {goto Done;for (int i = 0 ; i < eventCount; i++) {const SequenceNumber seq = eventItems[i].data.u64;uint32_t epollEvents = eventItems[i].events;if (seq == WAKE_EVENT_FD_SEQ) {if (epollEvents & EPOLLIN) {awoken ();else {ALOGW ("Ignoring unexpected epoll events 0x%x on wake event fd." , epollEvents);else {const auto & request_it = mRequests.find (seq);if (request_it != mRequests.end ()) {const auto & request = request_it->second;int events = 0 ;if (epollEvents & EPOLLIN) events |= EVENT_INPUT;if (epollEvents & EPOLLOUT) events |= EVENT_OUTPUT;if (epollEvents & EPOLLERR) events |= EVENT_ERROR;if (epollEvents & EPOLLHUP) events |= EVENT_HANGUP;push ({.seq = seq, .events = events, .request = request});else {for (size_t i = 0 ; i < mResponses.size (); i++) {editItemAt (i);if (response.request.ident == POLL_CALLBACK) {int callbackResult = response.request.callback->handleEvent (fd, events, data);clear ();return result;
所以确实是epoll机制,最终走到的就是epoll_wait进入阻塞,等待被唤醒或者超时被唤醒。并且在这里我们看到了别的逻辑,就是Looper不仅仅是给Java层使用的,它除了默认用于唤醒的mWakeEventfd外,还支持添加别的eventfd,并且别的eventfd唤醒epoll后会构建Response来处理这些消息。事实上就是如此,著名的ServiceManager就使用了Looper,然后将Binder的fd添加到Looper中来监听Binder的消息,这是额外的话题,以后再说。
1 2 3 4 5 6 7 8 9 10 11 12 13 14 15 16 17 18 19 20 21 22 static void android_os_MessageQueue_nativeWake (JNIEnv* env, jclass clazz, jlong ptr) reinterpret_cast <NativeMessageQueue*>(ptr);wake ();void NativeMessageQueue::wake () wake ();void Looper::wake () uint64_t inc = 1 ;ssize_t nWrite = TEMP_FAILURE_RETRY (write (mWakeEventFd.get (), &inc, sizeof (uint64_t )));if (nWrite != sizeof (uint64_t )) {if (errno != EAGAIN) {LOG_ALWAYS_FATAL ("Could not write wake signal to fd %d (returned %zd): %s" ,get (), nWrite, strerror (errno));
唤醒流程非常清晰,根据Java层传来的地址找到NativeMessageQueue,最终走到Looper.wake方法来进行唤醒,唤醒的方式也是最简单的向eventfd中写入一个1。
小结 Native层也有一个Looper,他与Java层差不多,也是线程唯一的。当在Java层创建MessageQueue时,也会同时在Native层创建一个NativeMessageQueue并赋值给Java层的mPtr属性,由此将二者进行绑定。然后在NativeMessageQueue创建时,还会创建native层的Looper,后续的阻塞和唤醒都是在native层的Looper中通过eventfd和epoll机制进行的。
通过前面对Java层的Handler消息机制的分析,我们知道了整体的逻辑:
初始化:首先在线程中启用Java的Looper,此时会创建Java的MessageQueue用于存储消息,同时会通过nativeInit进入到Native层创建了NativeMessageQueue和Native的Looper。 读取:Java层的Looper会进入循环,一直读取MessageQueue中的消息。读不到的时候会通过nativePollOnce进入到native层,然后在Native层的Looper中通过epoll机制进入阻塞状态。 写入:Java层的Handler发送消息到MessageQueue中,通过nativeWake进入到native层,然后在Native的Looper中向mWakeEventfd写入一个值,用于唤醒epoll的阻塞。唤醒后回到Java层的Looper开始处理消息,然后继续阻塞。 这里我们看到实际的阻塞和唤醒都是在native层实现的,并且Native层还有一个Looper。注意这里的NativeMessageQueue实际是没啥用的,它存在的作用就是连接Java层和Native层,它将native Looper等信息存储在自己的对象中,然后将对象的地址保存在Java中。后续的交互就是Java层根据地址找到NativeMessageQueue进而找到native Looper。
从前面的分析我们知道了Looper进入阻塞的时候,是通过epoll机制阻塞的,而熟悉epoll机制(点击查看epoll和eventfd )的我们知道,epoll可以监听多个eventfd,也就是说我们可以向Looper中注册自己的eventfd实现阻塞和唤醒。
前面我们看到在Looper中,会给我们提供一个默认的mWakeEventfd用来唤醒和阻塞,并且这个fd仅仅是用来唤醒和阻塞的。但是我们看到Looper的逻辑中是可以添加自己的eventfd的,然后在被自己的eventfd唤醒的时候还会自动执行操作,类似于一个消息机制了,接下来看看这个是怎么完成的。
1 2 3 4 5 6 7 8 9 10 11 12 13 14 15 16 17 18 19 20 21 22 23 24 25 26 27 28 29 30 31 32 33 34 35 36 37 38 39 40 41 42 43 44 45 46 47 48 49 Looper::addFd (int fd, int ident, int events, Looper_callbackFunc callback, void * data) {if (callback) {make (callback);return addFd (fd, ident, events, looperCallback, data);int Looper::addFd (int fd, int ident, int events, const sp<LooperCallback>& callback, void * data) if (!callback.get ()) {else {if (mNextRequestSeq == WAKE_EVENT_FD_SEQ) mNextRequestSeq++;const SequenceNumber seq = mNextRequestSeq++;createEpollEvent (request.getEpollEvents (), seq);auto seq_it = mSequenceNumberByFd.find (fd);if (seq_it == mSequenceNumberByFd.end ()) {int epollResult = epoll_ctl (mEpollFd.get (), EPOLL_CTL_ADD, fd, &eventItem);emplace (seq, request);emplace (fd, seq);else {int epollResult = epoll_ctl (mEpollFd.get (), EPOLL_CTL_MOD, fd, &eventItem);const SequenceNumber oldSeq = seq_it->second;erase (oldSeq);emplace (seq, request);return 1 ;
在添加fd的时候,要求传入一个LooperCallback,它是用来处理消息的,然后将这些参数封装成Request对象,然后存入到mRequest集合中,并且向epoll中添加对应的eventfd。正常来说,添加完之后就可以开始监听了,有两个监听的方法:ponnOnce和pollAll,其中pollOnce就是阻塞一次,唤醒后会处理消息,然后就返回了。而pollAll则是循环调用pollOnce,只要pollOnce的返回值是CALLBACK,就继续进入阻塞等待事件。
1
2
3
4
5
6
7
8
9
10
11
12
13
14
15
16
17
18
19
20
21
22
23
24
25
26
27
int Looper::pollAll (int timeoutMillis, int * outFd, int * outEvents, void ** outData) if (timeoutMillis <= 0 ) {int result;do {pollOnce (timeoutMillis, outFd, outEvents, outData);while (result == POLL_CALLBACK);return result;else {nsecs_t endTime = systemTime (SYSTEM_TIME_MONOTONIC)milliseconds_to_nanoseconds (timeoutMillis);for (;;) {int result = pollOnce (timeoutMillis, outFd, outEvents, outData);if (result != POLL_CALLBACK) {return result;nsecs_t now = systemTime (SYSTEM_TIME_MONOTONIC);toMillisecondTimeoutDelay (now, endTime);if (timeoutMillis == 0 ) {return POLL_TIMEOUT;
其中pollOnce我们前面已经看过了,就是进入阻塞,然后唤醒后构建Response,然后进行处理事件。下面再看一次:
1
2
3
4
5
6
7
8
9
10
11
12
13
14
15
16
17
18
19
20
21
22
23
24
25
26
27
28
29
30
31
32
33
34
35
36
37
38
39
40
41
42
43
44
45
46
47
48
49
50
51
52
53
54
55
56
57
58
59
60
61
62
63
64
65
int Looper::pollOnce (int timeoutMillis, int * outFd, int * outEvents, void ** outData) int result = 0 ;for (;;) {if (result != 0 ) {return result;pollInner (timeoutMillis);int Looper::pollInner (int timeoutMillis) int result = POLL_WAKE;clear ();0 ;true ;struct epoll_event eventItems[EPOLL_MAX_EVENTS];int eventCount = epoll_wait (mEpollFd.get (), eventItems, EPOLL_MAX_EVENTS, timeoutMillis);false ;for (int i = 0 ; i < eventCount; i++) {const SequenceNumber seq = eventItems[i].data.u64;uint32_t epollEvents = eventItems[i].events;if (seq == WAKE_EVENT_FD_SEQ) {if (epollEvents & EPOLLIN) {awoken ();else {const auto & request_it = mRequests.find (seq);if (request_it != mRequests.end ()) {const auto & request = request_it->second;int events = 0 ;if (epollEvents & EPOLLIN) events |= EVENT_INPUT;if (epollEvents & EPOLLOUT) events |= EVENT_OUTPUT;if (epollEvents & EPOLLERR) events |= EVENT_ERROR;if (epollEvents & EPOLLHUP) events |= EVENT_HANGUP;push ({.seq = seq, .events = events, .request = request});for (size_t i = 0 ; i < mResponses.size (); i++) {editItemAt (i);if (response.request.ident == POLL_CALLBACK) {int fd = response.request.fd;int events = response.events;void * data = response.request.data;int callbackResult = response.request.callback->handleEvent (fd, events, data);return result;
所以我们在c++层中,就可以通过添加fd以及对应的callback,当fd发生变化的时候就会唤醒epoll,然后执行callback了。实际上Looper在Native层用的更多,像我们熟悉的ServiceManager也使用了Looper机制。