我们知道使用FFmpeg解封装就是从音频中不断地读取AVPacket,但读取的packet仍是压缩后的数据,如果我们想要播放,还必须要将其解压成原始的音视频数据才能播放,这个过程就是解码操作。同样,反过来将原始的音视频数据压缩成对应的格式的过程,称为编码过程。
解码音频
编解码相关的模块是avcodec模块, 因为音视频数据的压缩格式是不同的,因此当读取到音视频流之后,需要根据流的信息来选择不同的解码器进行解码。音频流解码出来的是PCM数据,视频流解码出来的基本上都是YUV数据,具体是什么数据取决于它的压缩方式。
解封装后我们拿到的是AVPacket,它代表着一段音频或视频数据,我们通过特定的解码器将其解码,解码后的结果就是AVFrame。注意的是,一个AVPacket解码出来后并不是对应一个AVFrame,尤其是对于视频流的解码。可能一个AVPacket解码出多个AVFrame,也可能一个AVFrame也解不出来。
音频信息
音频流数据基本上都是PCM数据,它主要的参数就是采样率和采样精度以及通道数。音频本质上就是一个音波,我们将其模拟成数字信息存储在文件中,而从波到数字的转换就是在波上获取采样点,当采样点足够多的时候,这些采样点就可以组成一个波,从而模拟出声波。采样率就是每秒钟的采样个数,通常采样率为44100Hz,采样率越大,声音模拟的越真实,但同样文件大小也会变大。
然后就是采样精度,采样精度是用来记录波的高度的,如果将其对应到坐标系中,采样精度就是用什么类型的数字来表示y的大小,通常有8bit、16bit等,采样精度越高,对声音的模拟越真实,同样文件大小也会变大。
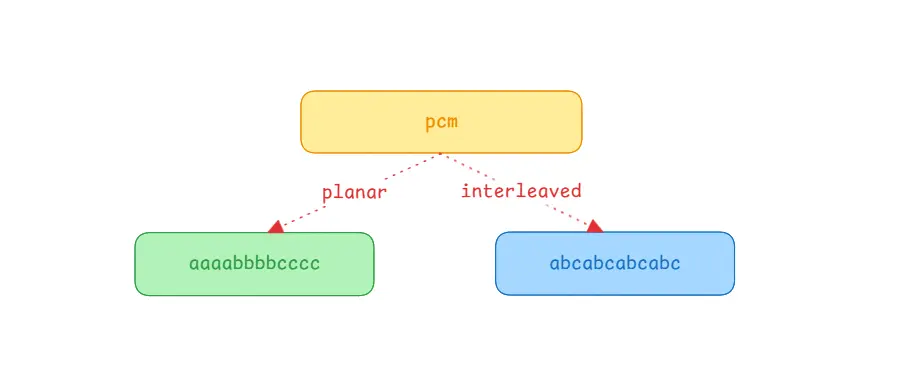
通道数也即是声道数,常用的是双声道的立体音。其中每个声道的数据都是独立的,假如有一个单通道的PCM数据的大小是2M,那么双通道的大小为4M,其实就是相当于两个PCM音频拼接成一个音频这样。在FFmpeg中多通道的音频在排列上分为平面模式planar和交错模式Interleaved,其中planar模式就是按顺序存放,先第一通道的数据,再第二通道数据,再第三通道数据,类似于简单的拼接,AAABBBCCC这样存储。而Interleaved模式则是交错模式,每个通道的数据交错在一块,如ABCABCABC这样,这也是实际中的PCM的存储方式。
解码音频数据
解码后的被称为AVFrame,解码的数据在其data和extend_data数据中,它们都是一个二维数组,区别就是data是一个固定大小为8的数组,而extend_data的大小不固定。对于视频而言它们基本上是没有区别的,但是对于音频来说就有了区别。
对于planar模式的音频,它们会按顺序排列,即data[0]代表第一个通道数据,data[1]代表的是第二个通道的数据,如果通道数不超过8那没什么区别,如果超过8则只能使用extend_data了。
对于Interleaved模式的音频,它们会交错在一起,最终看起来就相当于只有一个通道,因此直接使用data[0]或者extend_data[0]来拿数据就行了。
1
2
3
4
5
| void read_audio(AVFrame *frame) {
AVSampleFormat sampleFormat = (AVSampleFormat)frame->format;
int dataLength = frame->nb_samples * av_get_bytes_per_sample(sampleFormat);
fwrite(frame->data[0], sizeof(uint8_t), dataLength, pcmFile);
}
|
如上示例,简单点就是计算音频数据的长度,然后将第一通道的音频数据写入到输出文件中,该文件就是PCM文件。注意这里的长度是计算出来的,通过采样个数(nb_samples)乘以每个采样点的大小得到的长度。其实也可以通过frame->linesize[0]来获取到长度,但是可能因为对齐等问题,导致该长度比实际的数据长度要长,因此这里直接通过计算获取长度。
planar模式是在FFmpeg中的模式,大部分的解码器解出来的都是planar模式,但是实际中的音频却都是Interleaved模式。如果我们只想保存某个通道的音频,那planar模式无疑非常简单,但要想所有通道都保存的话,则需要将解码出来的数据重新交错成Interleaved模式。
1
2
3
4
5
6
7
8
9
10
11
12
13
14
15
| void read_audio(AVFrame *frame) {
AVSampleFormat sampleFormat = (AVSampleFormat)frame->format;
int sampleLength = av_get_bytes_per_sample(sampleFormat);
for(int sample = 0; sample < frame->nb_samples; sample++) {
for(int channel = 0; channel < frame->ch_layout.nb_channels; channel++) {
fwrite(
frame->extended_data[channel] + sample * sampleLength,
sizeof(uint8_t),
sampleLength,
pcmFile
);
}
}
}
|
注意只有planar模式下才能交错写入,如果是Interleaved模式,直接写入data[0]即可。放在一起就是这样的:
1
2
3
4
5
6
7
8
9
10
11
12
13
14
15
16
17
18
19
20
21
22
| void read_audio(AVFrame *frame) {
AVSampleFormat sampleFormat = (AVSampleFormat)frame->format;
int sampleLength = av_get_bytes_per_sample(sampleFormat);
int sampleCount = frame->nb_samples;
if(av_sample_fmt_is_planar(sampleFormat)) {
for(int sample = 0; sample < frame->nb_samples; sample++) {
for(int channel = 0; channel < frame->ch_layout.nb_channels; channel++) {
fwrite(
frame->extended_data[channel] + sample * sampleLength,
sizeof(uint8_t),
sampleLength,
pcmFile
);
}
}
} else {
fwrite(frame->data[0], sizeof(uint8_t), sampleLength * sampleCount, pcmFile);
}
}
|
还有一点,解码出来的PCM裸数据是很大的,一个10M的MP3文件解出来的PCM数据大约100M,注意自己的存储空间。另外就是PCM裸流是无法直接播放的,因为不清楚视频的参数,如采样率、采样大小等信息,因此可以在运行时打印出这些信息,方便我们测试音频是否导出正常:
1
2
3
4
5
6
7
| char sampleName[50];
av_get_sample_fmt_string(sampleName, 50, audioCodecContext->sample_fmt);
printf("sampleRame = %d, sampleFmt = %s, channel = %d\n",
audioCodecContext->sample_rate,
sampleName,
audioCodecContext->ch_layout.nb_channels
);
|
输出内容如下:
1
| sampleRame = 44100, sampleFmt = fltp 32 , channel = 2
|
因此,当运行结束后,我们可以根据这些参数来进行播放,我们可以将PCM导出到电脑上用ffplay播放,或者在线进行播放都行。
ffplay命令:ffplay.exe -f f32le -ch_layout stereo -sample_rate 44100 -i audio.pcm
主要注意-f参数,也就是我们打印的sampleFmt参数,该参数为fltp 32,也就是32位的浮点数,所以命令参数为f32le;然后是-ch_layout通道数,单通道输入mono,双通道输入stereo。
完整代码
1
2
3
4
5
6
7
8
9
10
11
12
13
14
15
16
17
18
19
20
21
22
23
24
25
26
27
28
29
30
31
32
33
34
35
36
37
38
39
40
41
42
43
44
45
46
47
48
49
50
51
52
53
54
55
56
57
58
59
60
61
62
63
64
65
66
67
68
69
70
71
72
73
74
75
76
77
78
79
80
81
82
83
84
85
86
87
88
89
90
91
92
93
94
95
96
97
98
99
100
101
102
103
104
105
106
107
108
109
110
111
112
113
114
115
116
117
118
119
120
121
122
123
124
125
126
127
128
129
130
131
132
133
134
135
136
137
138
139
140
141
142
143
144
145
|
extern "C" {
#include "libavformat/avformat.h"
#include "libavcodec/avcodec.h"
#include "libavutil/samplefmt.h"
}
AVFormatContext *inFormatCtx = nullptr;
AVPacket *packet = nullptr;
AVFrame *frame = nullptr;
const AVCodec *audioCodec = nullptr;
AVCodecContext *audioCodecContext = nullptr;
FILE *pcmFile;
void read_audio(AVFrame *frame) {
AVSampleFormat sampleFormat = (AVSampleFormat)frame->format;
int sampleLength = av_get_bytes_per_sample(sampleFormat);
int sampleCount = frame->nb_samples;
if(av_sample_fmt_is_planar(sampleFormat)) {
for(int sample = 0; sample < frame->nb_samples; sample++) {
for(int channel = 0; channel < frame->ch_layout.nb_channels; channel++) {
fwrite(
frame->extended_data[channel] + sample * sampleLength,
sizeof(uint8_t),
sampleLength,
pcmFile
);
}
}
} else {
fwrite(frame->data[0], sizeof(uint8_t), sampleLength * sampleCount, pcmFile);
}
}
void free() {
if(inFormatCtx != nullptr) {
avformat_close_input(&inFormatCtx);
inFormatCtx = nullptr;
}
if(packet != nullptr) {
av_packet_free(&packet);
packet = nullptr;
}
if (frame != nullptr) {
av_frame_free(&frame);
}
if(pcmFile != nullptr) {
fclose(pcmFile);
pcmFile = nullptr;
}
}
int convert(char* inputFile, char* outputFile) {
int ret;
ret = avformat_open_input(&inFormatCtx, inputFile, nullptr, nullptr);
if(ret) {
printf("error in open stream");
free();
return -1;
}
pcmFile = fopen(outputFile, "wb");
ret = avformat_find_stream_info(inFormatCtx, nullptr);
if(ret < 0) {
printf("find stream error");
free();
return -1;
}
int streamIndex = -1;
for(int i = 0; i < inFormatCtx->nb_streams; i++) {
AVStream *stream = inFormatCtx->streams[i];
if(stream->codecpar->codec_type != AVMEDIA_TYPE_AUDIO) {
continue;
}
streamIndex = i;
audioCodec = avcodec_find_decoder(stream->codecpar->codec_id);
audioCodecContext = avcodec_alloc_context3(audioCodec);
avcodec_parameters_to_context(audioCodecContext, stream->codecpar);
avcodec_open2(audioCodecContext, audioCodec, nullptr);
}
if(audioCodec == nullptr || audioCodecContext == nullptr) {
printf("cannot find audioCodec\n");
free();
return -1;
}
char sampleName[50];
av_get_sample_fmt_string(sampleName, 50, audioCodecContext->sample_fmt);
printf("sampleRame = %d, sampleFmt = %s, channel = %d\n",
        audioCodecContext->sample_rate,
        sampleName,
        audioCodecContext->ch_layout.nb_channels
);
packet = av_packet_alloc();
frame = av_frame_alloc();
while (true) {
ret = av_read_frame(inFormatCtx, packet);
if(ret) {
printf("end of file\n");
break;
}
if (packet->stream_index != streamIndex) {
printf("other packet, ignore\n");
av_packet_unref(packet);
continue;
}
avcodec_send_packet(audioCodecContext, packet);
while (true) {
ret = avcodec_receive_frame(audioCodecContext, frame);
if(ret < 0) {
break;
}
read_audio(frame);
av_frame_unref(frame);
}
}
avcodec_send_packet(audioCodecContext, nullptr);
while (true) {
ret = avcodec_receive_frame(audioCodecContext, frame);
if(ret < 0) {
break;
}
read_audio(frame);
av_frame_unref(frame);
}
printf("finish\n");
free();
return 0;
}
|
代码逻辑很清晰,还是一样的流程。先打开音视频文件,然后查找流,加载对应的解码器,读packet,将packet发给解码器,从解码器中读解码后的数据frame,将frame中的pcm写入本地。
然后就是在jni中使用:
1
2
3
4
5
6
7
8
9
10
11
12
13
| extern "C" JNIEXPORT void JNICALL
Java_com_example_ffmpegdemo_MainActivity_convert(
JNIEnv* env,
jobject ,
jstring input,
jstring output) {
const char* in = env->GetStringUTFChars(input, nullptr);
const char* out = env->GetStringUTFChars(output, nullptr);
convert(in, out);
env->ReleaseStringUTFChars(input, in);
env->ReleaseStringUTFChars(output, out);
}
|
在MainActivity中使用:
1
2
3
4
5
6
7
8
9
10
| binding.button.setOnClickListener {
thread {
val inputFile = File(cacheDir, "1.mkv")
val outputFile = File(cacheDir, "2.pcm")
convert(inputFile.absolutePath, outputFile.absolutePath)
}
}
|
注意这里的input文件,可以是视频文件,也可以是音频文件。
总结
前面是解码音频的逻辑,主要就是在打开文件后查询流信息,然后这里我们只关注了音频的信息,即只创建了音频的解码器和解码器上下文,后面的逻辑就是不断的读packet然后发送给解码器,然后再从解码器中读取解码后的frame。如果我们在查询流信息后也创建了对应的视频解码器和解码器上下文,那么我们就可以将属于音频的packet发送给音频解码器,将属于视频的packet发送给视频解码器,最终各自处理解码后的frame即可。