一个视频文件通常包含两个数据流,一个是音频流,一个是视频流,我们解封装就是为了拿到这两个流。但是这两个流通常都是经过高度压缩后的数据,如果我们想要将其播放出来,就需要对数据流进行解压缩,即解码。

解码视频

FFmpeg中,将音频和视频视作同一类数据,解码流程都是一样的。先直接读一段AVPacket,然后交个各自的解码器去解码,解码后的原始数据在AVFrame中。音频比较简单,解码后的数据就是PCM数据,唯一需要注意的就是多通道音频的排列模式是否是planar模式,如果是的话需要将其重新交错成interleaved模式的数据。

但视频不同,视频解码后的数据主要分为两类,一类是YUV数据,一类是RGB数据。其中YUV数据中根据UV分量的大小又分为YUV420YUV422YUV444等,然后又根据其各个分量之间的排列方式又分为YUV420pYUV420sp等,总之就是将三个分量各种排列就成了各种数据格式。RGB也没好到哪里去,首先根据是否有透明度通道分为RGBARGB,然后就是各种排列这几个颜色分成RGBAABGRARGB等等。

因此,当我们解码视频后,拿到的原始数据可能是各种格式的,而我们要做的就是将其转换成我们想要播放的格式。目前市面上使用最广的编码方式都是H264编码,而其原始数据为YUV420P格式,但在FFmpeg中没有区分YUV420P的子类,即图像是YV12还是YU12?而是只有一个AV_PIX_FMT_YUV420P的格式。

1
2
3
4
5
6
YYYYYYYY
YYYYYYYY
YYYYYYYY
YYYYYYYY
UUUUUUUU
VVVVVVVV

以上是YUV420P中的YU12的排列方式,即按顺序排列YUV分量,其中UV分量是Y分量的1/4

音频流数据基本上都是PCM数据,它主要的参数就是采样率和采样精度以及通道数。音频本质上就是一个音波,我们将其模拟成数字信息存储在文件中,而从波到数字的转换就是在波上获取采样点,当采样点足够多的时候,这些采样点就可以组成一个波,从而模拟出声波。采样率就是每秒钟的采样个数,通常采样率为44100Hz,采样率越大,声音模拟的越真实,但同样文件大小也会变大。

然后就是采样精度,采样精度是用来记录波的高度的,如果将其对应到坐标系中,采样精度就是用什么类型的数字来表示y的大小,通常有8bit16bit等,采样精度越高,对声音的模拟越真实,同样文件大小也会变大。

解码视频数据

FFmpeg解码后的数据结构为AVFrame,解码的数据在其dataextend_data二维数组中,区别就是data是一个固定大小为8的数组,而extend_data的大小不固定。它们前8个元素指针指向的是相同的,而超过8个后只能通过extend_data来获取数据,因此用哪个数组取数据都是可以的,最通用的方式就是直接用extend_data而不用data

对于音频数据我们可以通过采样点的个数和每个采样点的大小来计算数据长度,而对于视频数据,则需要通过widthheight属性来计算宽高。注意不要直接使用linesize,因为对其问题可能会导致通过linesize获取的数据长度比原始数据长度要长。

1
2
3
4
5
6
7
8
9
10
11
12
13
14
15
16
17
18
19
20
21
22
23
24
25
26
27
28
29
30
31
32
33
34
void read_video(AVFrame *frame) {
//YUV420P格式, Y分量大小为宽乘高,U和V分量的大小一样,等于Y的1/4

int yLinesize = frame->linesize[0];
int uLinesize = frame->linesize[1];
int vLinesize = frame->linesize[2];
// 写入Y数据
for(int i = 0; i < frame->height; i++) {
fwrite(
frame->data[0] + yLinesize * i,
sizeof(uint8_t),
frame->width,
yFile
);
}
// 写入U分量
for(int i = 0; i < frame->height / 2; i++) {
fwrite(
frame->data[1] + uLinesize * i,
sizeof(uint8_t),
frame->width / 2,
uFile
);
}
// 写入v分量
for(int i = 0; i < frame->height / 2; i++) {
fwrite(
frame->data[2] + vLinesize * i,
sizeof(uint8_t),
frame->width / 2,
vFile
);
}
}

如上示例,YUV数据分别存储在data的三个数组中,直接将其拷贝出来即可。注意不能一次直接读完,每个分量我们可以将其理解成一个图片,然后将其每一行连起来形成一个数据,这个数据就是data[0]。但因为对齐问题,图片可能大小是1023*1024,而在FFmpeg中解码后就变成了1024*1024,所以在data[0]中会出现冗余数据,我们读取数据的时候就需要将这个冗余数据剔除出去。这也就是为什么每次读取的长度为width,但偏移量却是linesize[0]

通过以上代码我们就可以直接将视频解码并保存各自的分量了,但是,注意这段代码千万不能在手机上运行,因为解码后的YUV数据是非常庞大的,一个1gmp4文件解出来可能会占用100g的存储空间,手机基本上是存不下的。

转成RGB

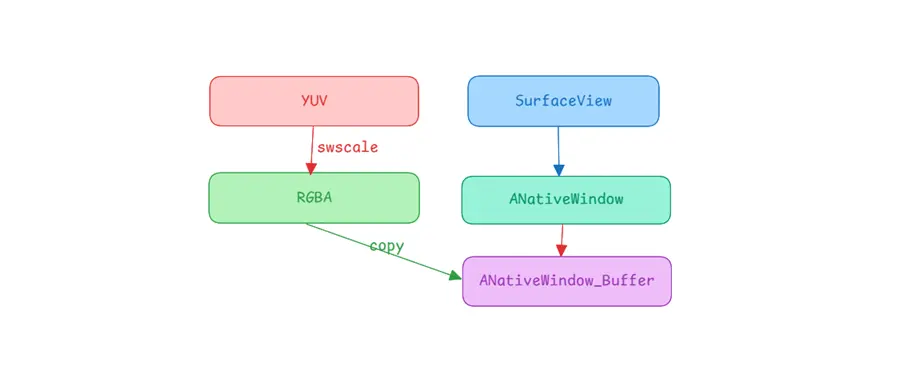
我们解码视频肯定是为了在手机中播放,而播放我们又通常会选用SurfaceView,因此我们需要将数据的YUV格式转换成RGB格式。当然我们可以自己手动转换,但是注意需要了解各种YUV格式,然后分别获取到各个分量进行转换,这肯定是很麻烦的。好在FFmpeg为我们准备好了对应的方法,使得我们直接可以进行转换,而无需了解各种YUV格式。

1
2
3
4
5
6
7
8
9
10
11
12
13
14
15
16
17
18
19
20
21
22
23
24
25
26
   // 拿到解码后的帧
AVFrame* firstFrame = decodeVideoFirstFrame(file);
SwsContext *swsContext = sws_getContext(
// 原始数据的宽高和格式
firstFrame->width, firstFrame->height, (AVPixelFormat)firstFrame->format,
// 目标数据的宽高和格式
targetWidth, targetHeight, AV_PIX_FMT_RGBA,
SWS_BICUBIC, nullptr, nullptr, nullptr
);
// 申请一个frame并设置data
AVFrame *rgbFrame = av_frame_alloc();
uint8_t *buffer = (uint8_t*)av_malloc(
av_image_get_buffer_size(AV_PIX_FMT_RGBA, targetWidth, targetHeight, 1)
);
av_image_fill_arrays(
rgbFrame->data, rgbFrame->linesize, buffer, AV_PIX_FMT_RGB24,
targetWidth, targetHeight, 1
);

// 开始转换
sws_scale(
swsContext, firstFrame->data, firstFrame->linesize, 0, firstFrame->height,
rgbFrame->data, rgbFrame->linesize
);

// 转换后的rgbFrame即为目标frame

从这里我们也能看到,实际上我们不需要关注各种图像格式的具体结构,我们只需要了解到我们想要什么结构就行,当解码出来的数据是YUV数据时,我们只需要直接将其转换成我们想要的RGB即可。

写入

当我们解码到RGB帧后,下一步就是将数据写入到SurfaceView中。

1
2
3
4
5
6
7
8
9
10
11
12
13
14
15
16
17
18
19
20
21
22
23
24
25
26
27
28
29
30
31
32
#include <jni.h>
#include <android/native_window_jni.h>

Java_com_example_ffmpegdemo_MainActivity_decodeFirstFrame(
JNIEnv* env,
jobject /* this */,
jobject surface,
jstring path) {

// 将Surface转换成nativeWindow
ANativeWindow *aNativeWindow = ANativeWindow_fromSurface(env, surface);
// 设置格式,注意这里的宽高不能超过其实际的宽高
ANativeWindow_setBuffersGeometry(aNativeWindow,targetWidth, targetHeight, WINDOW_FORMAT_RGBA_8888);
// 写入到window中的buffer
ANativeWindow_Buffer b;
ANativeWindow_lock(aNativeWindow, &b, nullptr);
auto *dst = (uint8_t* )b.bits;
// 逐行将rgbFrame的数据复制到buffer中
for(int i = 0; i < targetHeight; i++) {
memcpy(
dst + i * b.stride * 4,
rgbFrame->data[0] + i * rgbFrame->linesize[0],
targetWidth * 4
);
}
// 如果格式一样,可以直接复制
//if(b.stride == rgbFrame->linesize[0]) {
// memcpy(dst, rgbFrame->data[0], b.stride * targetHeight * 4);
//}

ANativeWindow_unlockAndPost(aNativeWindow);
}

不像YUV数据那样有三个分量,RGB数据只有一个分量,每个像素点由RGB组成,如果有透明度的话,可能还有A数据,它们是交织在一起的,每个像素点由三个或四个元素组成,因此,它们在AVFrame中是只有data[0]一个数据的,同样的也只有linesize[0]有数据。

SurfaceView中,数据格式通常有RGBA_8888RGB_565RGB_888。意思也是一样的,对于RGBA_8888就是每个像素点有四个分量组成,每个分量占8个bit,按照四个颜色RGBA顺序排列,因此每个像素点占4个byte。同理RGB_565也是这样,每个像素占2个byte。因此在转换YUVRGB时,最好选择和Surface一样的格式方便直接复制写入。

完整代码

1
2
3
4
5
6
7
8
9
10
11
12
13
14
15
16
17
18
19
20
21
22
23
24
25
26
27
28
29
30
31
32
33
34
35
36
37
38
39
40
41
42
43
44
45
46
47
48
49
50
51
52
53
54
55
56
57
58
59
60
61
62
63
64
65
66
67
68
69
70
71
72
73
74
75
76
77
78
79
80
81
82
83
84
85
86
87
88
89
90
91
92
93
94
95
96
97
98
99
100
101
102
103
104
105
106
107
108
109
110
111
112
113
114
115
116
117
118
119
120
121
122
123
124
125
126
127
128
129
130
131
132
133
134
135
136
137
138
139
140
141
142
143
144
145
146
147
148
149
150
151
152
153
154
155
156
157
158
159
160
161
162
#include <jni.h>
#include <android/native_window_jni.h>
#include <android/log_macros.h>
#define LOG_TAG "MyTAG"

extern "C" {
#include "libavformat/avformat.h"
#include "libavcodec/avcodec.h"
#include "libswscale/swscale.h"
#include "libavutil/imgutils.h"
}

AVFormatContext *inFormatCtx = nullptr;
AVPacket *packet = nullptr;
const AVCodec *videoCodec = nullptr;
AVCodecContext *videoCodecContext = nullptr;

void free() {
if(inFormatCtx != nullptr) {
avformat_close_input(&inFormatCtx);
inFormatCtx = nullptr;
}
if(packet != nullptr) {
av_packet_free(&packet);
packet = nullptr;
}
}

// 解码出视频的第一帧
AVFrame* decodeVideoFirstFrame(const char* file) {
int ret;
// 打开输入文件
ret = avformat_open_input(&inFormatCtx, file, nullptr, nullptr);
if(ret) {
ALOGD("error in open stream");
free();
return nullptr;
}
// 查找流
ret = avformat_find_stream_info(inFormatCtx, nullptr);
if(ret < 0) {
ALOGD("find stream error");
free();
return nullptr;
}
int streamIndex = -1;
for(int i = 0; i < inFormatCtx->nb_streams; i++) {
AVStream *stream = inFormatCtx->streams[i];
if(stream->codecpar->codec_type != AVMEDIA_TYPE_VIDEO) {
continue;
}
streamIndex = i;
videoCodec = avcodec_find_decoder(stream->codecpar->codec_id);
videoCodecContext = avcodec_alloc_context3(videoCodec);
avcodec_parameters_to_context(videoCodecContext, stream->codecpar);
avcodec_open2(videoCodecContext, videoCodec, nullptr);
}
if(videoCodec == nullptr || videoCodecContext == nullptr) {
ALOGD("cannot find videoCodec\n");
free();
return nullptr;
}
// 开始解码
packet = av_packet_alloc();
AVFrame *frame = av_frame_alloc();
while (true) {
ret = av_read_frame(inFormatCtx, packet);
if(ret) {
ALOGD("end of file\n");
break;
}
if (packet->stream_index != streamIndex) {
ALOGD("other packet, ignore\n");
av_packet_unref(packet);
continue;
}

// 发送packet
avcodec_send_packet(videoCodecContext, packet);
// 解码出frame
ret = avcodec_receive_frame(videoCodecContext, frame);
if(ret < 0) {
continue;
}
break;
}
free();
return frame;
}

// JNI方法
extern "C" JNIEXPORT void JNICALL
Java_com_example_ffmpegdemo_MainActivity_decodeFirstFrame(
JNIEnv* env,
jobject /* this */,
jobject surface,
jstring path) {

const char* file = env->GetStringUTFChars(path, nullptr);

int targetWidth = 1080;
int targetHeight = 1080 * 1080 / 1920;

AVFrame* firstFrame = decodeVideoFirstFrame(file);
ALOGD("first = %dX%d\n", firstFrame->width, firstFrame->height);

SwsContext *swsContext = sws_getContext(
// 原始数据的宽高和格式
firstFrame->width, firstFrame->height, (AVPixelFormat)firstFrame->format,
// 目标数据的宽高和格式
targetWidth, targetHeight, AV_PIX_FMT_RGBA,
SWS_BICUBIC, nullptr, nullptr, nullptr
);


// 申请一个frame并设置data
AVFrame *rgbFrame = av_frame_alloc();
uint8_t *buffer = (uint8_t*)av_malloc(
av_image_get_buffer_size(AV_PIX_FMT_RGBA, targetWidth, targetHeight, 1)
);
av_image_fill_arrays(
rgbFrame->data, rgbFrame->linesize, buffer, AV_PIX_FMT_RGBA,
targetWidth, targetHeight, 1
);

// 开始转换
sws_scale(
swsContext,
firstFrame->data,
firstFrame->linesize,
0,
firstFrame->height,
rgbFrame->data,
rgbFrame->linesize
);

// 解码后将数据复制到surface中
ANativeWindow *aNativeWindow = ANativeWindow_fromSurface(env, surface);
ANativeWindow_setBuffersGeometry(aNativeWindow,targetWidth, targetHeight, WINDOW_FORMAT_RGBA_8888);

ANativeWindow_Buffer b;

ANativeWindow_lock(aNativeWindow, &b, nullptr);
auto *dst = (uint8_t* )b.bits;
ALOGD("stride = %d\n", b.stride);
/*for(int i = 0; i < targetHeight; i++) {
memcpy(
dst + i * b.stride * 4,
rgbFrame->data[0] + i * rgbFrame->linesize[0],
targetWidth * 4
);
}*/
memcpy(dst, rgbFrame->data[0], targetHeight * targetWidth * 4);
ANativeWindow_unlockAndPost(aNativeWindow);
return;
sws_freeContext(swsContext);
av_free(buffer);
av_frame_free(&rgbFrame);

env->ReleaseStringUTFChars(path, file);
}

以上逻辑就是在decodeFirstFrame这个jni方法中解码出第一帧视频帧,然后将其转换成RGBA格式,然后获取到Surface,并将数据直接复制到其对应的缓存中。至于在MainActivity中只需要将其传入即可。

1
2
3
4
5
6
7
8
9
10
11
12
13
14
15
16
17
18
19
val holder = binding.surfaceView.holder
holder.addCallback(object : SurfaceHolder.Callback {
override fun surfaceCreated(holder: SurfaceHolder) {
thread {
// /data/data/com.example.ffmpegdemo/cache/1.mkv
val file = File(cacheDir, "1.mkv")
decodeFirstFrame(holder.surface, file.absolutePath)
}
}

override fun surfaceChanged(
holder: SurfaceHolder,
format: Int,
width: Int,
height: Int
) {}

override fun surfaceDestroyed(holder: SurfaceHolder) {}
})

总结

使用FFmpeg我们很容易解码视频,也就是获取到实际的音频数据以及视频数据,当我们拿到数据后,对其进行播放也就比较简单了,即PCM的音频数据可以使用AudioTracker播放,视频数据转换成RGBA后使用SurfaceView进行播放即可,这样,我们也就能实现一个音频播放器了。