zygote进程是所有Java进程的祖先,用户所接触到的所有的应用基本上都是Java应用,因此是非常重要的一个服务。同样的,他也是由init进程解析对应的rc而创建的,但是它是处于late-init阶段的,是在ServiceManager之后启动的进程。
源码基于Android 13
zygote zygote进程有区分32位和64位,但是基本上现在都是使用64位的了。我们可以先从它对应的rc文件中看下它的基础启动做了什么:
1
2
3
4
5
6
7
8
9
10
# system/core/rootdir/init.zygote64.rc
启动了zygote的可执行文件,然后创建了两个socket,下面的配置就是onrestart触发器,表示当zygote重启时,会重启很多其他强关联的进程,这里我们不需要关注。注意看这里可执行文件名称叫做zpp_process64,因此我们找对应的源码时,应该去找app_process项目。
1 2 3 4 5 6 7 8 9 10 11 12 13 14 15 16 17 18 19 20 21 22 23 24 25 26 27 28 29 30 31 32 33 34 35 36 37 38 39 40 41 42 43 44 45 46 47 48 49 50 51 52 53 54 55 56 57 58 59 60 61 62 63 64 65 66 67 68 69 70 71 72 73 74 75 76 77 78 79 80 81 82 83 84 85 86 int main (int argc, char * const argv[]) AppRuntime runtime (argv[0 ], computeArgBlockSize(argc, argv)) ;int i;for (i = 0 ; i < argc; i++) {addOption (strdup (argv[i]));ALOGV ("app_process main add option '%s'" , argv[i]);bool zygote = false ;bool startSystemServer = false ;bool application = false ;while (i < argc) {const char * arg = argv[i++];if (strcmp (arg, "--zygote" ) == 0 ) {true ;else if (strcmp (arg, "--start-system-server" ) == 0 ) {true ;else if (strcmp (arg, "--application" ) == 0 ) {true ;else if (strncmp (arg, "--nice-name=" , 12 ) == 0 ) {12 );else if (strncmp (arg, "--" , 2 ) != 0 ) {break ;else {break ;if (!className.empty ()) {add (application ? String8 ("application" ) : String8 ("tool" ));setClassNameAndArgs (className, argc - i, argv + i);else {maybeCreateDalvikCache ();if (startSystemServer) {add (String8 ("start-system-server" ));for (; i < argc; ++i) {add (String8 (argv[i]));if (!niceName.empty ()) {setArgv0 (niceName.c_str (), true );if (zygote) {start ("com.android.internal.os.ZygoteInit" , args, zygote);else if (!className.empty ()) {start ("com.android.internal.os.RuntimeInit" , args, zygote);else {app_usage ();
在app_main中会解析一系列的参数,最终根据不同的模式来启动不同的runtime。在zygote的启动中,分为zygote模式和其他模式,其他模式又分为application和tool模式,这些都是根据传递的参数来决定的。对于我们从rc文件的启动中而言,走的是zygote模式。
AppRuntime实际是继承自AndroidRuntime的,因此我们可以直接看zygote模式的启动。
1 2 3 4 5 6 7 8 9 10 11 12 13 14 15 16 17 18 19 20 21 22 23 24 25 26 27 28 29 30 31 32 33 34 35 36 37 38 39 40 41 42 43 44 45 46 47 48 49 50 51 52 53 54 55 56 57 58 59 60 61 62 63 64 65 void AndroidRuntime::start (const char * className, const Vector<String8>& options, bool zygote) static const String8 startSystemServer ("start-system-server" ) bool primary_zygote = false ;for (size_t i = 0 ; i < options.size (); ++i) {if (options[i] == startSystemServer) { true ;const int LOG_BOOT_PROGRESS_START = 3000 ;LOG_EVENT_LONG (LOG_BOOT_PROGRESS_START, ns2ms (systemTime (SYSTEM_TIME_MONOTONIC)));Init (NULL );if (startVm (&mJavaVM, &env, zygote, primary_zygote) != 0 ) {return ;onVmCreated (env);if (startReg (env) < 0 ) {ALOGE ("Unable to register all android natives\n" );return ;char * slashClassName = toSlashClassName (className != NULL ? className : "" );FindClass (slashClassName);if (startClass == NULL ) {ALOGE ("JavaVM unable to locate class '%s'\n" , slashClassName);else {GetStaticMethodID (startClass, "main" ,"([Ljava/lang/String;)V" );if (startMeth == NULL ) {ALOGE ("JavaVM unable to find main() in '%s'\n" , className);else {CallStaticVoidMethod (startClass, startMeth, strArray);free (slashClassName);;if (mJavaVM->DetachCurrentThread () != JNI_OK)ALOGW ("Warning: unable to detach main thread\n" );if (mJavaVM->DestroyJavaVM () != 0 )ALOGW ("Warning: VM did not shut down cleanly\n" );
在JNI中,主要就是启动虚拟机,注册JNI方法,然后找到传递进来的类并调用其main方法,由此,进入到了java环境中。这里一步一步查看,启动虚拟机这一步,代码非常多,但也主要就是配置各种虚拟机参数,这里不在关注。主要看下注册JNI方法:
1 2 3 4 5 6 7 8 9 10 11 12 13 14 15 16 17 18 19 20 21 22 23 24 25 26 27 28 29 30 31 32 33 34 35 36 37 38 39 40 41 42 43 44 45 46 int AndroidRuntime::startReg (JNIEnv* env) if (register_jni_procs (gRegJNI, NELEM (gRegJNI), env) < 0 ) {PopLocalFrame (NULL );return -1 ;return 0 ;static int register_jni_procs (const RegJNIRec array[], size_t count, JNIEnv* env) for (size_t i = 0 ; i < count; i++) {if (array[i].mProc (env) < 0 ) {return -1 ;return 0 ;static const RegJNIRec gRegJNI[] = {REG_JNI (register_com_android_internal_os_RuntimeInit),REG_JNI (register_android_util_Log),int register_com_android_internal_os_RuntimeInit (JNIEnv* env) const JNINativeMethod methods[] = {"nativeFinishInit" , "()V" ,void *)com_android_internal_os_RuntimeInit_nativeFinishInit},"nativeSetExitWithoutCleanup" , "(Z)V" ,void *)com_android_internal_os_RuntimeInit_nativeSetExitWithoutCleanup},return jniRegisterNativeMethods (env, "com/android/internal/os/RuntimeInit" ,NELEM (methods));extern int register_android_util_Log (JNIEnv* env)
这里可以看到是动态注册的JNI方法,会遍历gRegJNI数组中的所有方法并执行,对应的方法会给对应的类注册JNI方法。实际上很多的方法并没有在该文件中声明,而是在具体的文件中注册的,这里通过extern直接引用了而已。例如Log类中的JNI方法是在register_android_util_Log中注册的,而该方法是在android_util_Log.cpp中实现的。Framework中的JNI方法都是在这里注册的,因此如果想要找对应的实现方法,可以通过这种格式来查找实现方法的位置:包名_类型.cpp。
当虚拟机启动后,并且完成了JNI方法的注册后,就该进入到java世界了,也就是会在jni中找到参数对应的类,然后找到类中的静态方法main,由此进入到java环境中。
1 2 3 4 5 6 7 8 9 10 11 12 13 14 15 16 17 18 19 20 21 22 23 24 25 26 27 28 29 30 31 32 33 34 35 36 37 38 39 40 41 42 43 44 45 46 47 48 49 50 51 52 public static void main (String[] argv) {try {boolean startSystemServer = false ;String zygoteSocketName = "zygote" ;if (!enableLazyPreload) {new ZygoteServer (isPrimaryZygote);if (startSystemServer) {Runnable r = forkSystemServer(abiList, zygoteSocketName, zygoteServer);if (r != null ) {return ;catch (Throwable ex) {"System zygote died with fatal exception" , ex);throw ex;finally {if (zygoteServer != null ) {if (caller != null ) {
在ZygoteInit中会先解析参数,然后预加载各种资源,尤其是预加载类,即在/system/etc/preloaded-classes文件中描述的各个类,这些类都是java虚拟机基础类以及framework中的类。因为后续其他的java进程都是从zygote进程fork出来的,所以他们不需要再次去加载了,而是直接使用即可,不仅缩短了加载时间还能保证各个进程用的都是同一套类库。
然后就是创建出一个ZygoteServer对象:
1 2 3 4 5 6 7 8 9 10 11 12 13 14 15 16 17 18 19 20 21 boolean isPrimaryZygote) {if (isPrimaryZygote) {else {true ;
ZygoteServer是用来监听名为zygote的socket,它是在rc文件中定义的,后续与其他进程的交互就是通过其处理的。我们先放在这里,继续看后续的流程,在zygote的后续,就是fork出system_server:
1 2 3 4 5 6 7 8 9 10 11 12 13 14 15 16 17 18 19 20 21 22 23 24 25 26 27 28 29 30 31 32 33 34 35 36 37 38 39 40 41 42 private static Runnable forkSystemServer (String abiList, String socketName, ZygoteServer zygoteServer) {"--setuid=1000" ,"--setgid=1000" ,"--setgroups=1001,1002,1003,1004,1005,1006,1007,1008,1009,1010,1018,1021,1023," "1024,1032,1065,3001,3002,3003,3005,3006,3007,3009,3010,3011,3012" ,"--capabilities=" + capabilities + "," + capabilities,"--nice-name=system_server" ,"--runtime-args" ,"--target-sdk-version=" + VMRuntime.SDK_VERSION_CUR_DEVELOPMENT,"com.android.server.SystemServer" ,int pid;try {null ,catch (IllegalArgumentException ex) {throw new RuntimeException (ex);if (pid == 0 ) {return handleSystemServerProcess(parsedArgs);return null ;
最终fork出了一个进程,并指定uid和gid均是1000,名称为system_server,这里实际是走到native层去fork的,具体细节就不再看了。对于zygote进程返回了个null,而对于system_server进程则返回这个Runnable然后并执行之后就结束了。
1 2 3 4 5 6 7 8 9 10 11 12 13 14 15 16 17 18 19 private static Runnable handleSystemServerProcess (ZygoteArguments parsedArgs) {if (parsedArgs.mInvokeWith != null ) {else {ClassLoader cl = getOrCreateSystemServerClassLoader();if (cl != null ) {return ZygoteInit.zygoteInit(parsedArgs.mTargetSdkVersion,
这里我们不再继续查看了,最终对于system_server进程返回的Runnable就是参数中传递的com.android.server.SystemServer其类的主函数。因此回到前面,我们知道在zygote进程fork出system_server后,新的进程就会执行SystemServer#main方法然后就结束了。然后zygote其本身则是进入了循环等到消息,等消息来了会执行各种操作,尤其是创建子进程的消息,如果创建了子进程,则会在子进程中返回Caller,然后执行run后结束。而父进程zygote则还是在runSelectLoop中进行循环等待。
1 2 3 4 5 6 7 8 9 10 11 12 13 14 15 16 17 18 19 20 21 22 23 24 25 26 27 28 29 30 31 32 33 34 35 36 37 38 39 40 41 42 43 44 45 46 47 48 49 50 51 runSelectLoop (String abiList) {while (true ) {int pollReturnValue;try {catch (ErrnoException ex) {throw new RuntimeException ("poll failed" , ex);if (pollReturnValue == 0 ) {else {boolean usapPoolFDRead = false ;while (--pollIndex >= 0 ) {if (pollIndex == 0 ) {else if (pollIndex < usapPoolEventFDIndex) {try {ZygoteConnection connection = peers.get(pollIndex);final Runnable command = this , multipleForksOK);if (mIsForkChild) {return command;else {catch (Exception e) {finally {false ;else {
到这里,zygote的流程基本上就走完了,进程会一直阻塞在runSelectLoop等待消息,而它创建的子进程则会返回出来,然后执行子进程返回的Runnable消息。
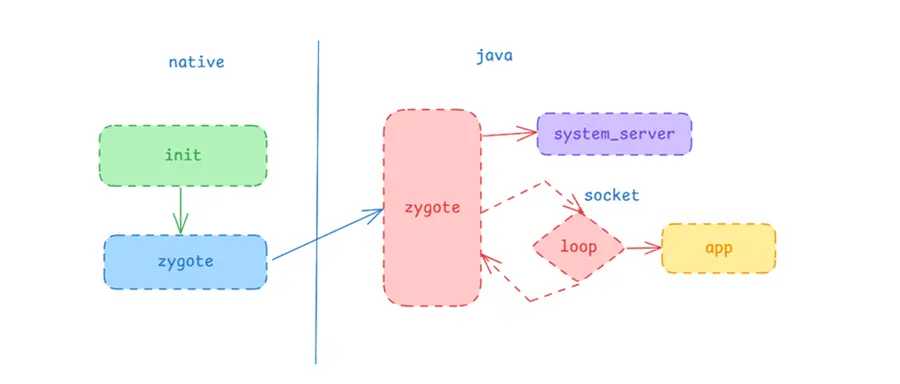
从native到java层,zygote确如其名,作为一个孵化进程存在。它预加载了各种属性以及类库,然后fork出一个system_server进程,然后进入循环阻塞状态等待socket的消息。通常情况下,我们启动一个app最终都是走到zygote中然后由其fork出来进程并执行其main方法。